o_O S2000 | Mk I — Stage II
Permission to engage...
-
TsukubaCody
- 9000rpm
- Posts: 45
- Joined: Nov 2016


#242
On your Amuse front bumper, I note you fitted the Honda badge, but not the OEM washer jets (which I'm sure your body shop could have done?), did you just decide you liked the smoother look, or was it a case of not bothered with them?
One of the things I like about the R1, is the fact that it just looks OEM+ and I think the fitting of the washer jets would have made it very hard for anyone other than S2000 cogniscenti to distinguish it as not being OEM.
One of the things I like about the R1, is the fact that it just looks OEM+ and I think the fitting of the washer jets would have made it very hard for anyone other than S2000 cogniscenti to distinguish it as not being OEM.
Mike R
Sarcasm is just a free service I provide.
Nordschleife, there's only two barriers to worry about - the ones on the left and the ones on the right .
.
Sarcasm is just a free service I provide.
Nordschleife, there's only two barriers to worry about - the ones on the left and the ones on the right
-
 andrewhake
- Admin
- Posts: 580
- Joined: Oct 2016
- Location: Mt. __________
- Contact: YouTube IG

#243
I think the UK is the only country that got S2000s with headlight washer jets? We don't have those in the U.S.MikeRT4 wrote:On your Amuse front bumper, I note you fitted the Honda badge, but not the OEM washer jets (which I'm sure your body shop could have done?), did you just decide you liked the smoother look, or was it a case of not bothered with them?
One of the things I like about the R1, is the fact that it just looks OEM+ and I think the fitting of the washer jets would have made it very hard for anyone other than S2000 cogniscenti to distinguish it as not being OEM.
#244
Something else I have learned ") .
.
Mike R
Sarcasm is just a free service I provide.
Nordschleife, there's only two barriers to worry about - the ones on the left and the ones on the right .
Sarcasm is just a free service I provide.
Nordschleife, there's only two barriers to worry about - the ones on the left and the ones on the right

-
andrewhake
- Admin
- Posts: 580
- Joined: Oct 2016
- Location: Mt. __________
- Contact: YouTube IG
#246
Nothing too exciting to post until a few parts arrive from Japan. It has been raining relentlessly in the bay area until just recently. The car is pretty glorious in the rain with the OS Giken LSD, and the RE71-R actually are very capable in the rain as well.
Honda - The Power of Dreams license plate frame
I did pickup a nice and simple license plate frame from Honda though! Not usually a fan of plate frames but this one was perfect. I had to trim off the tabs that usually wrap around the plate to fit the built in tabs in the stock rear bumper.
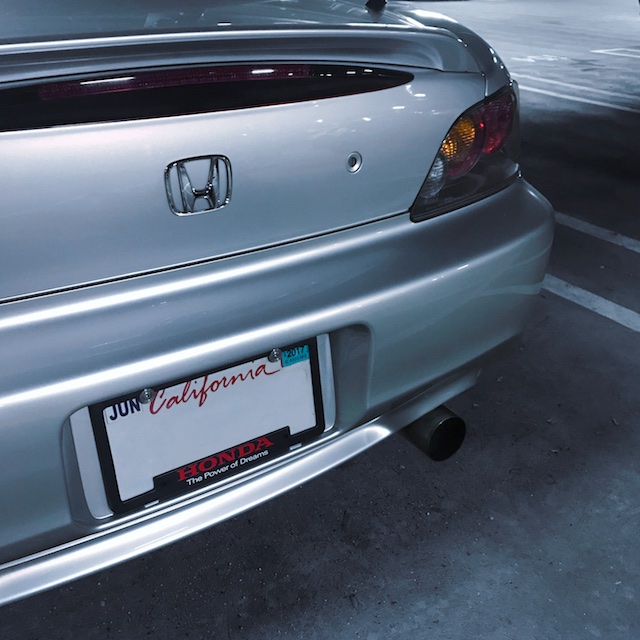
Soon I should be able to reveal why the ASM rear bumper still isn't painted and on the car, and I promise the wait will be worth it.
Honda - The Power of Dreams license plate frame
I did pickup a nice and simple license plate frame from Honda though! Not usually a fan of plate frames but this one was perfect. I had to trim off the tabs that usually wrap around the plate to fit the built in tabs in the stock rear bumper.
Soon I should be able to reveal why the ASM rear bumper still isn't painted and on the car, and I promise the wait will be worth it.
-
 Cpt. Spock
- 9000rpm
- Posts: 32
- Joined: Nov 2016
#247
 cant wait to see whats in store! The more i read through build threads, the more i think about doing my own. I love seeing the timeline and progress of the car.

#248
Are the Spoon mirrors fitted yet :p ") ?
?
Mike R
Sarcasm is just a free service I provide.
Nordschleife, there's only two barriers to worry about - the ones on the left and the ones on the right .
Sarcasm is just a free service I provide.
Nordschleife, there's only two barriers to worry about - the ones on the left and the ones on the right
-
andrewhake
- Admin
- Posts: 580
- Joined: Oct 2016
- Location: Mt. __________
- Contact: YouTube IG
#249
Not yet. I want to get everything painted at once and have been waiting patiently for some other parts to arrive before taking everything in. Which I believe was just delivered.MikeRT4 wrote:Are the Spoon mirrors fitted yet :p
I highly recommend it. It is a great way to just keep a well organized history of everything and discuss the changes you make to the car. Just a place to say whatever is on your mind about the car whether other people want to listen or not.Cpt. Spock wrote:
-
andrewhake
- Admin
- Posts: 580
- Joined: Oct 2016
- Location: Mt. __________
- Contact: YouTube IG
#250
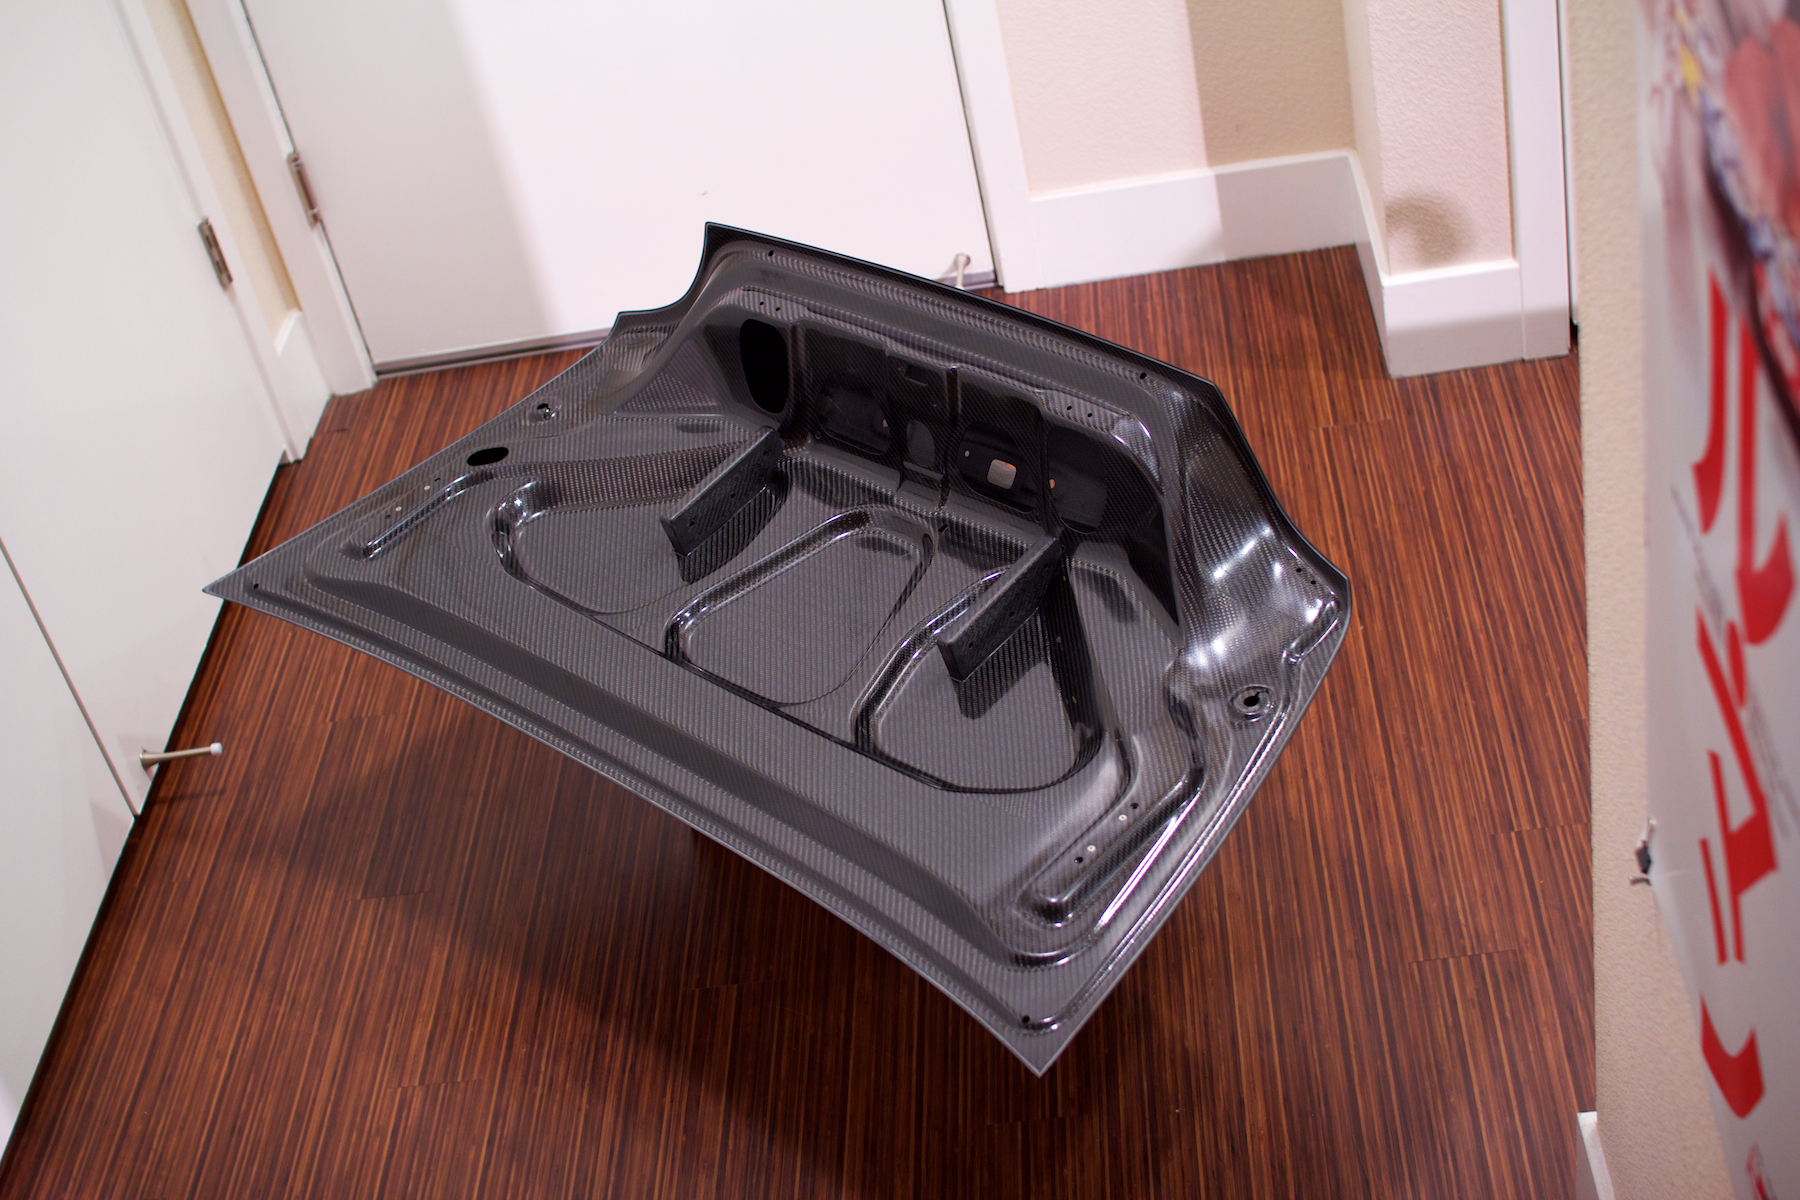
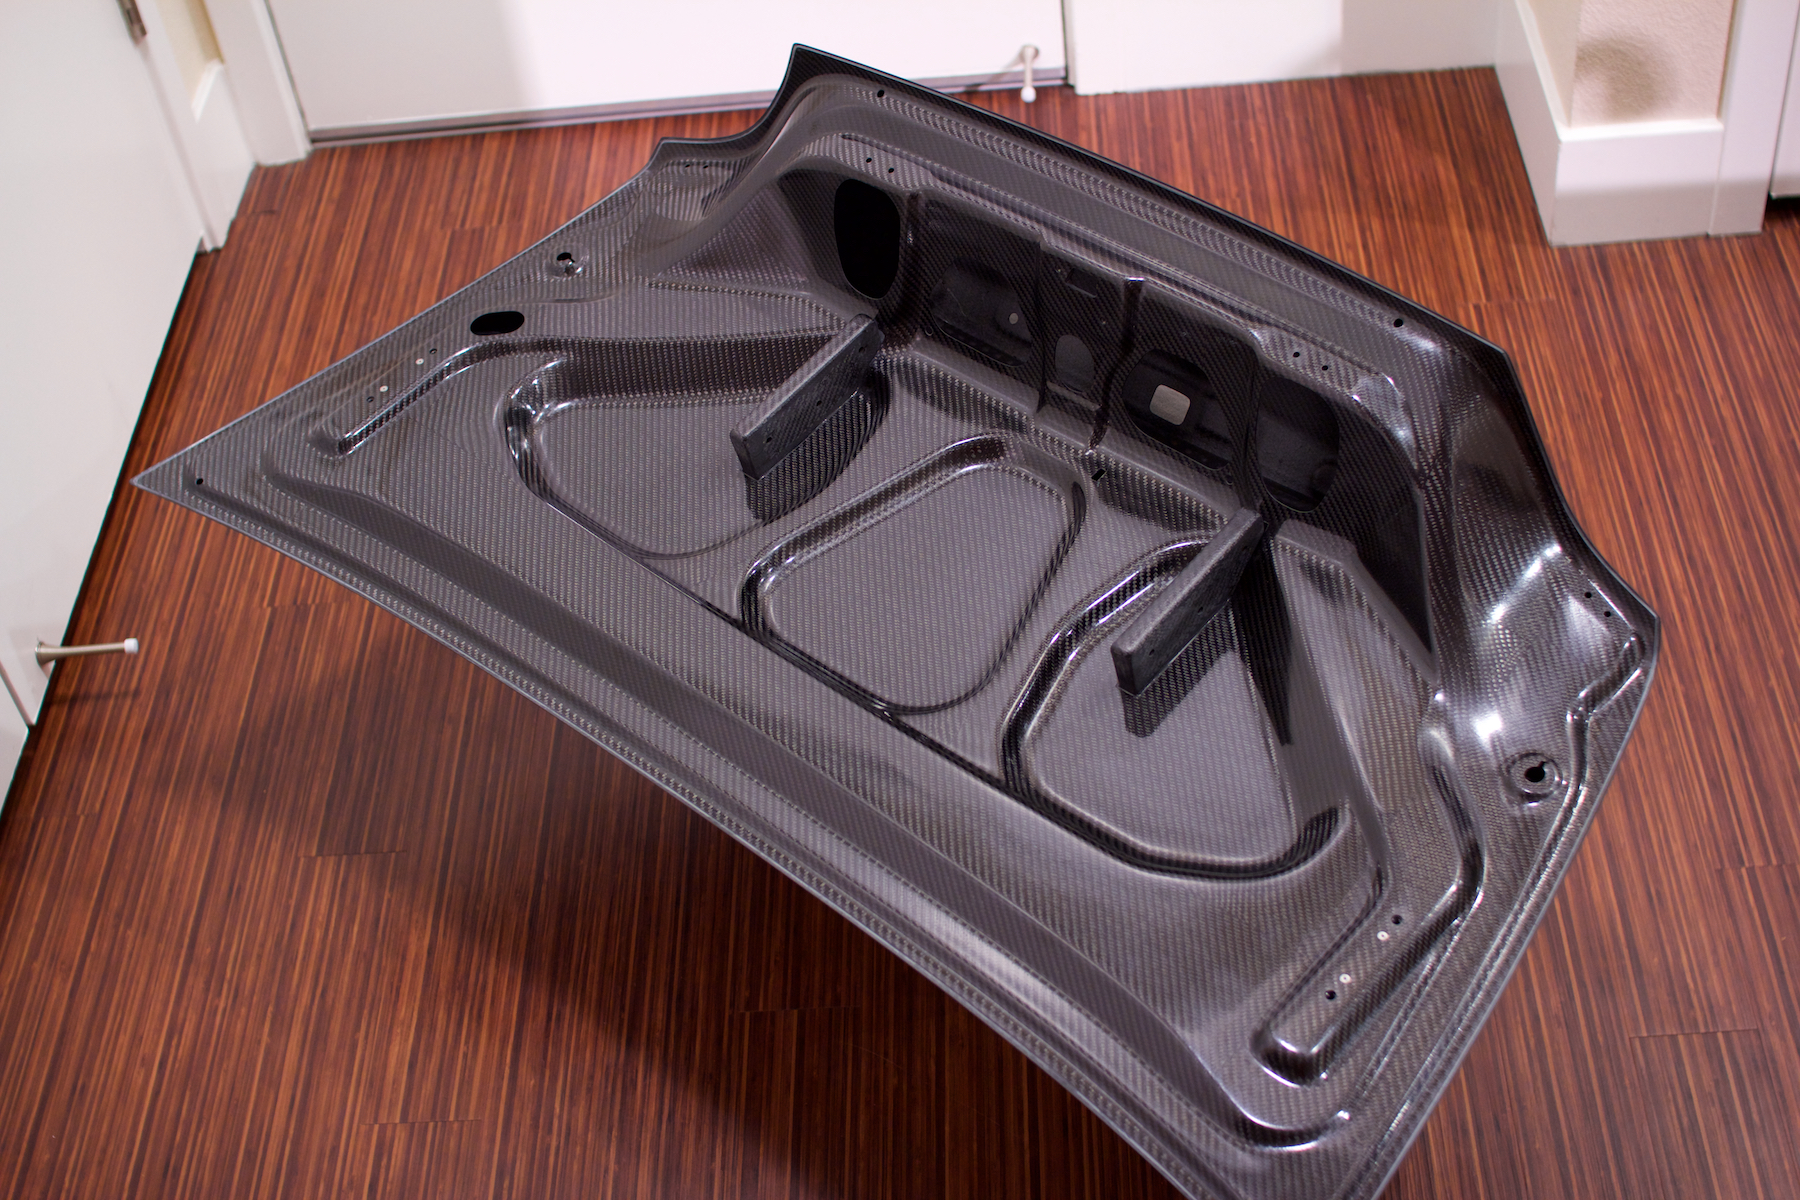
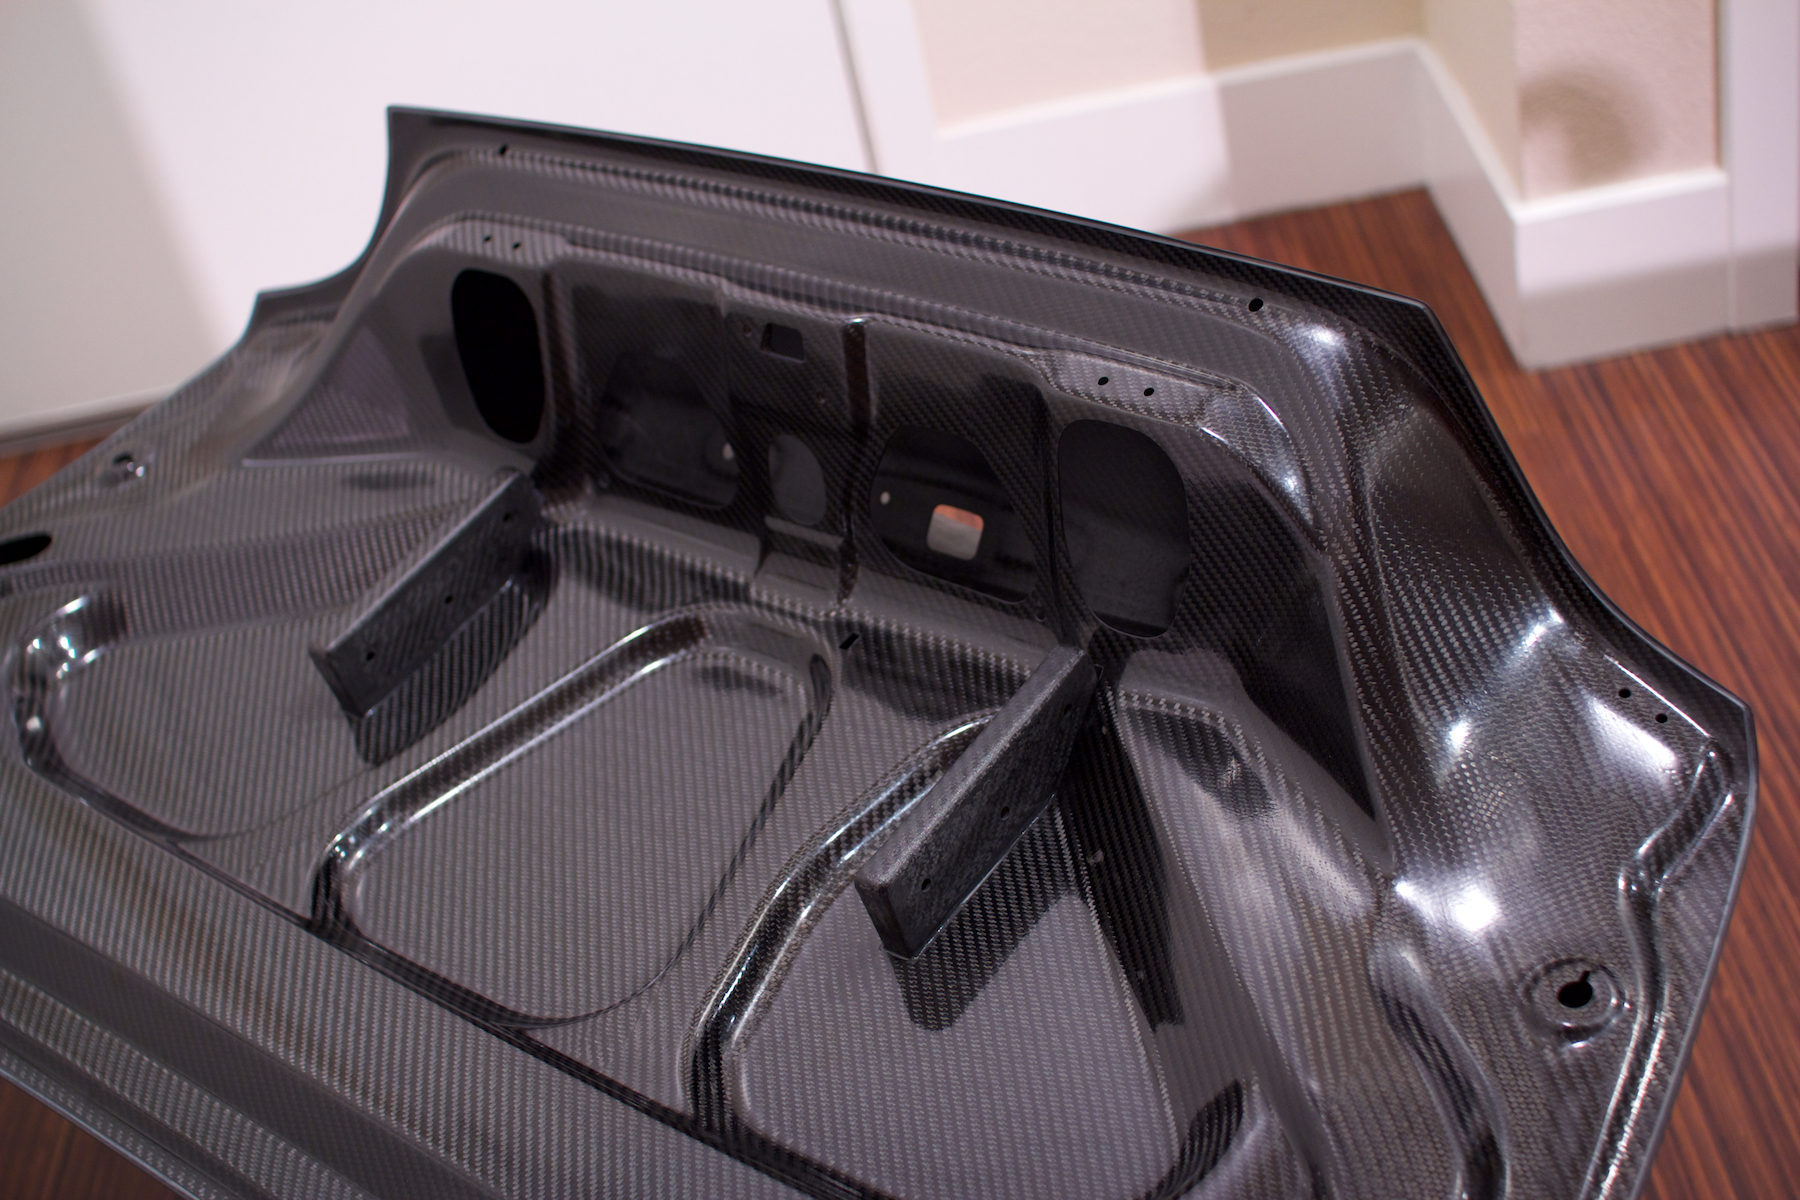
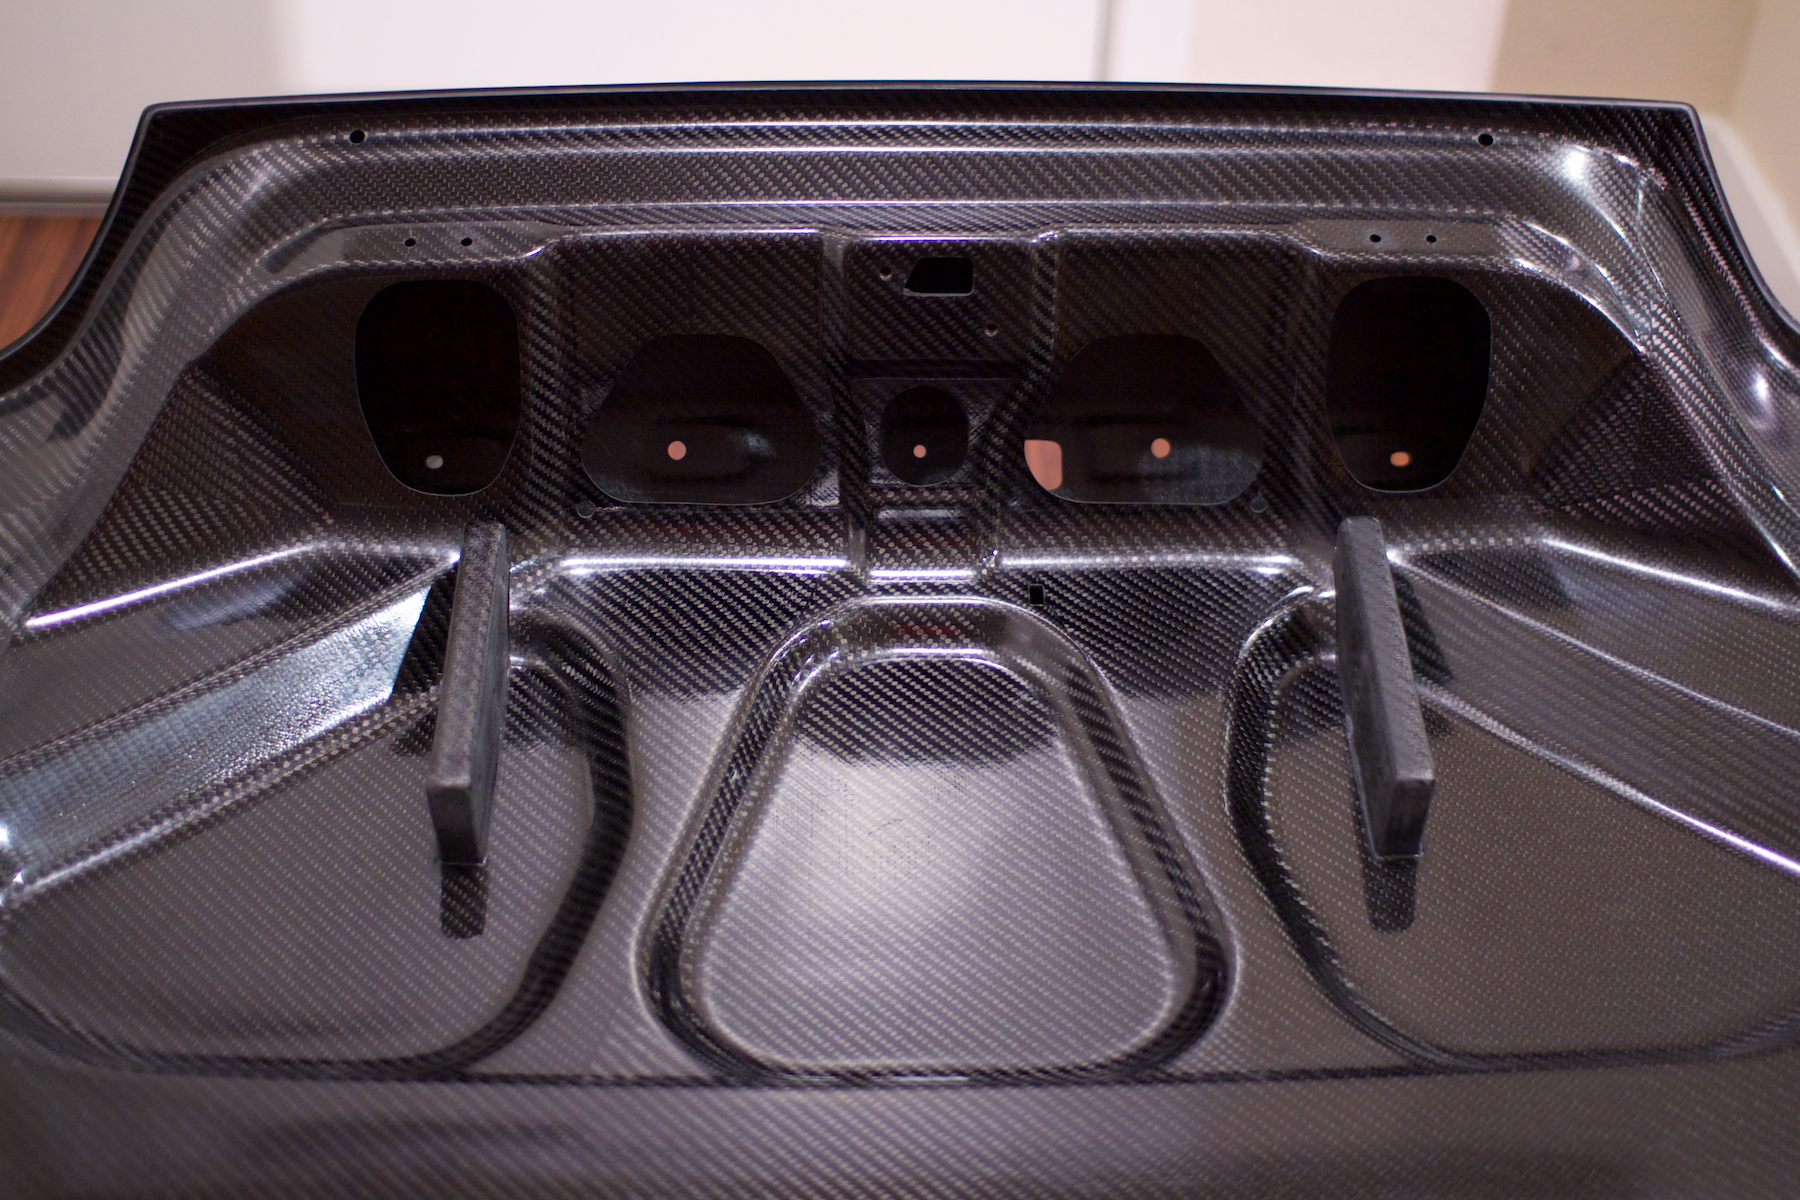
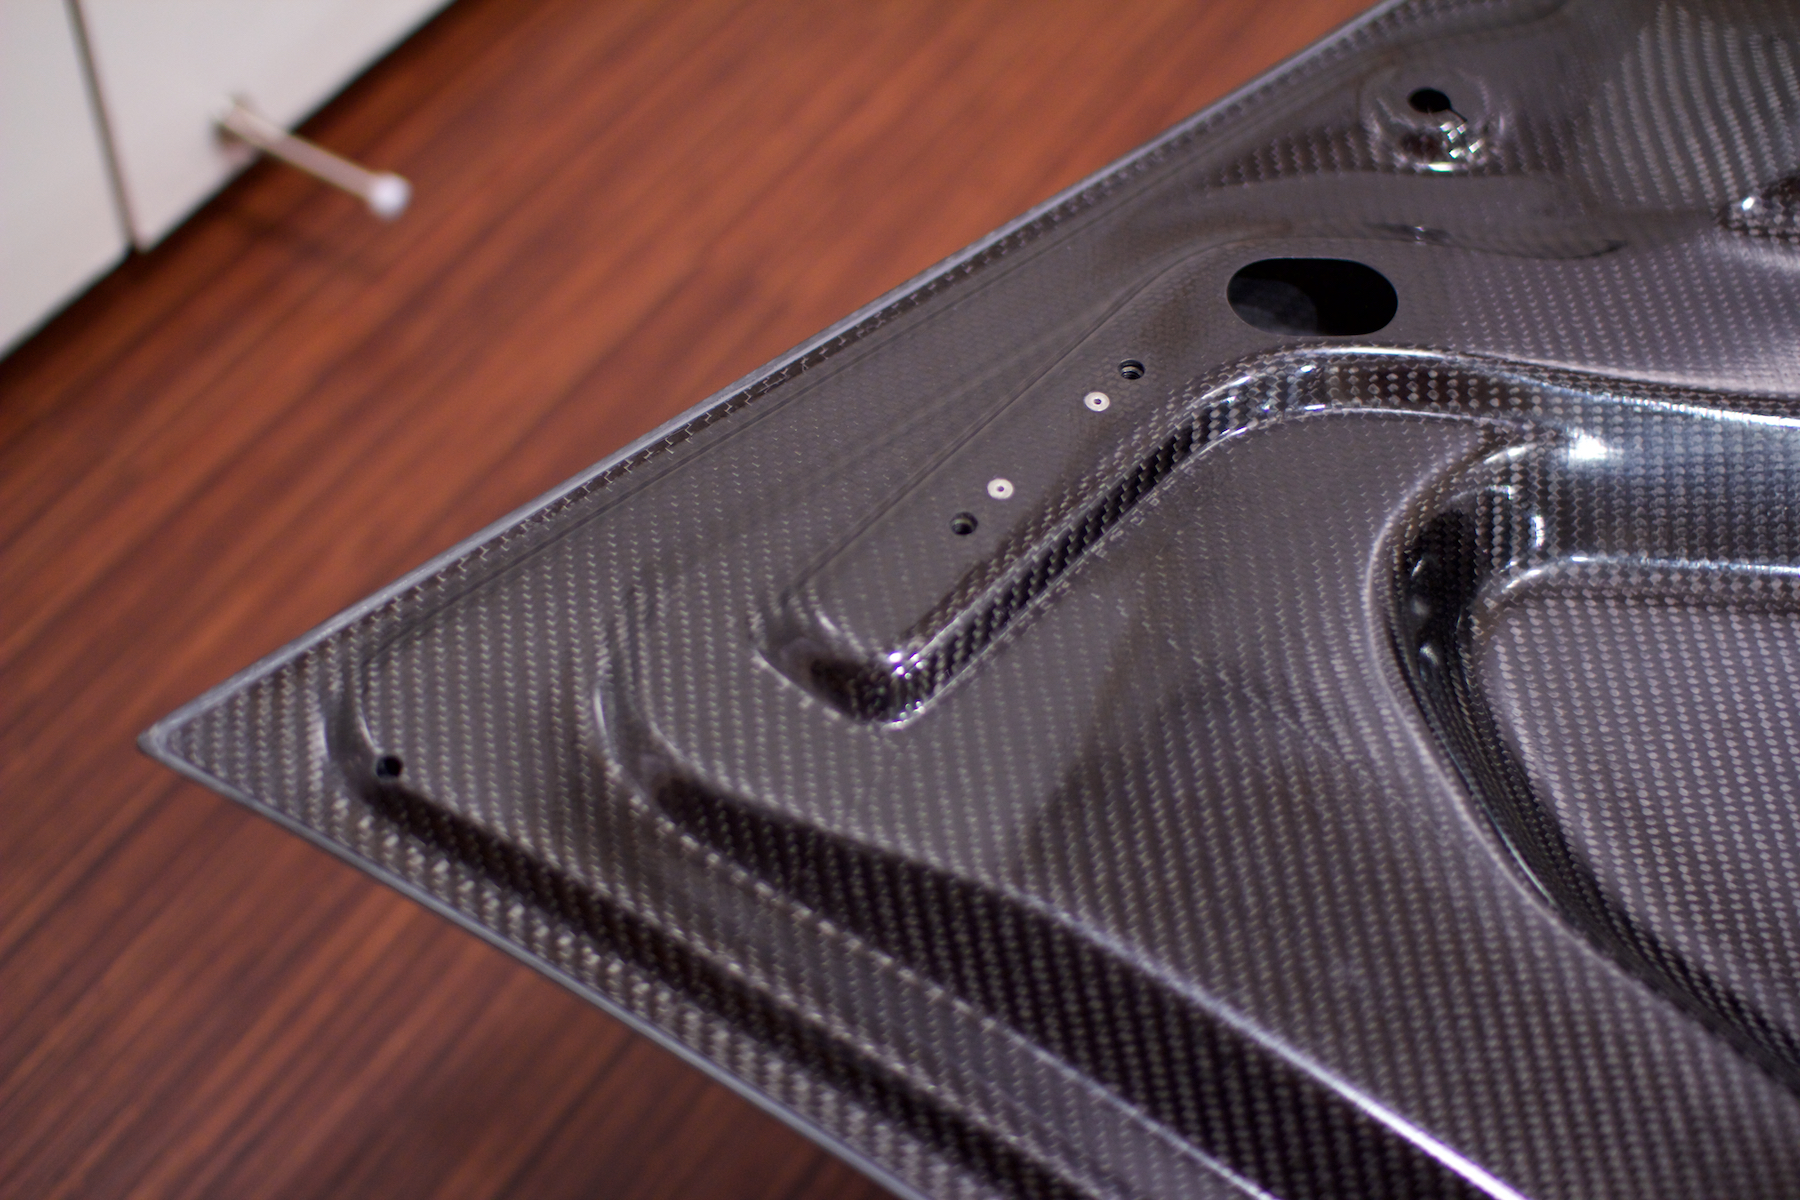
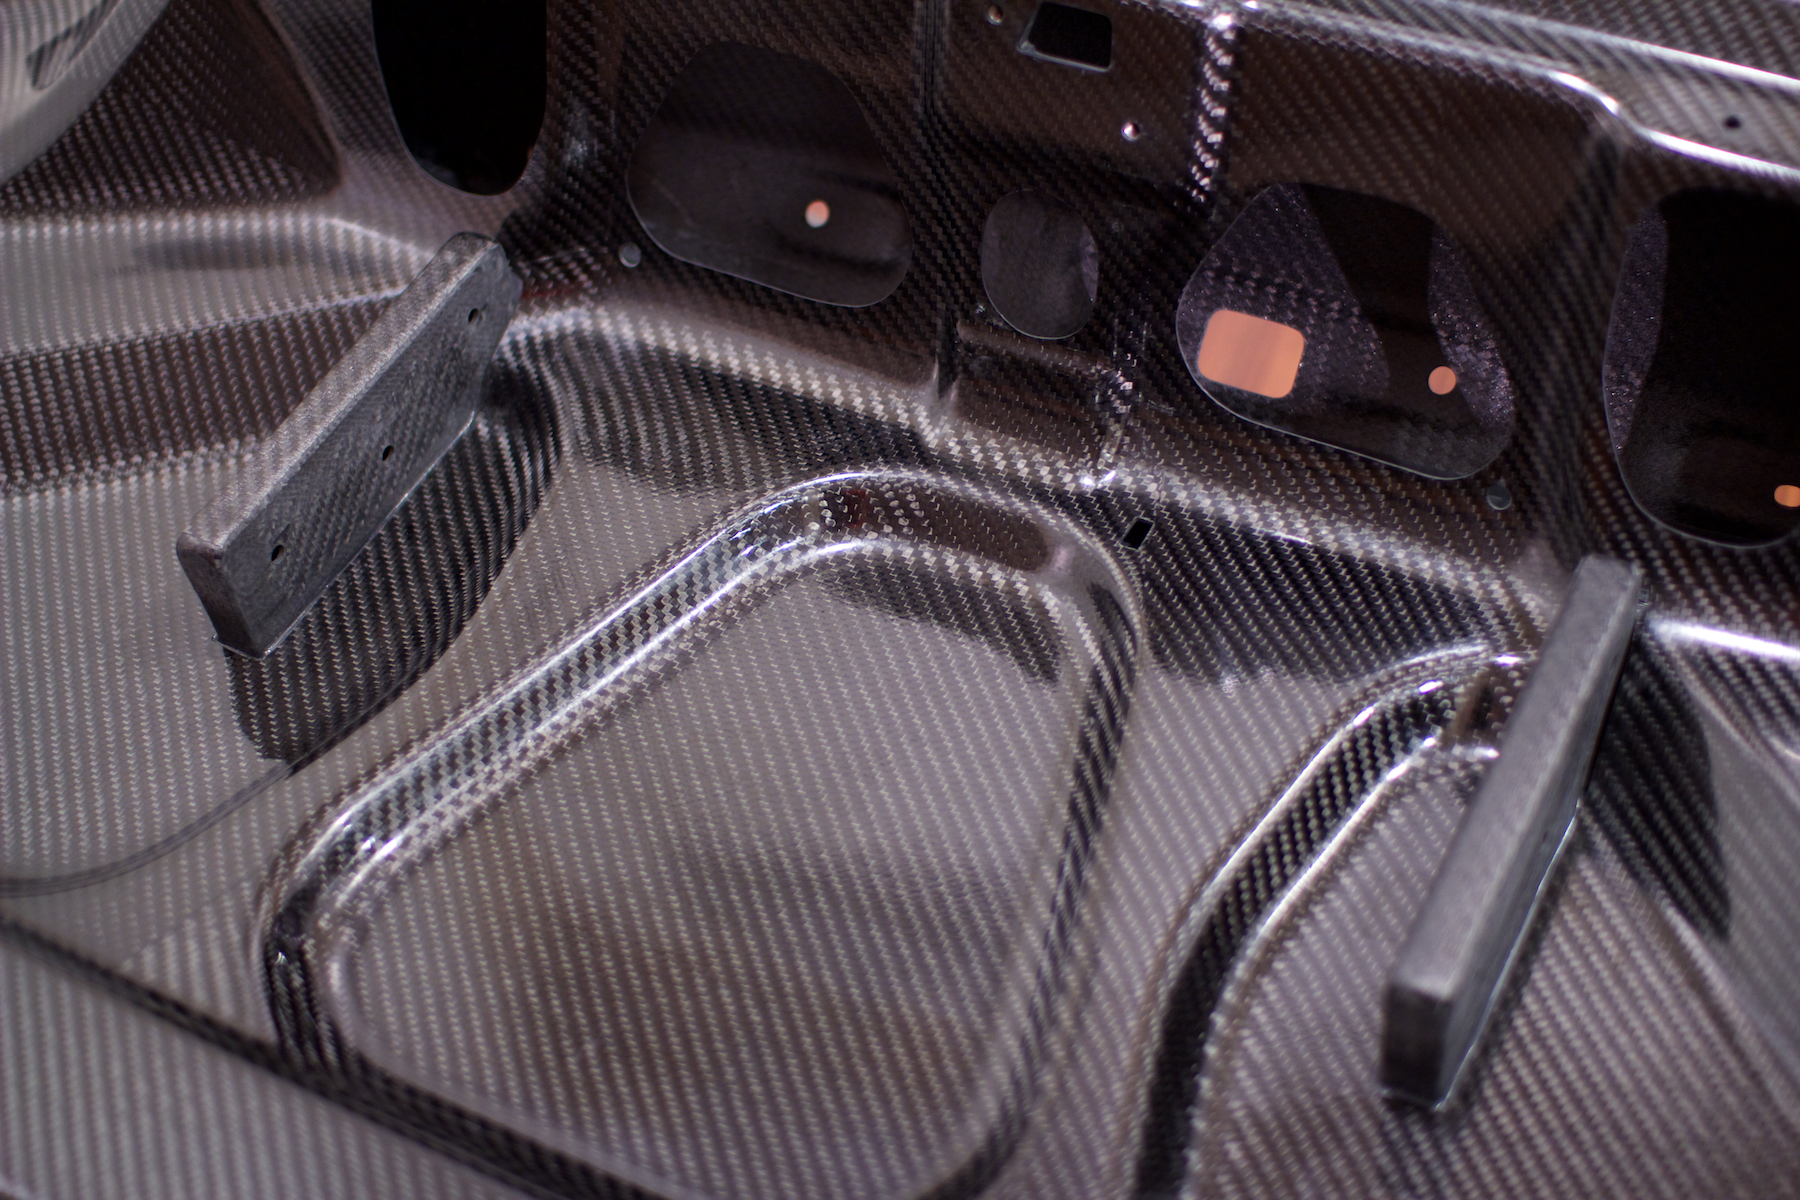
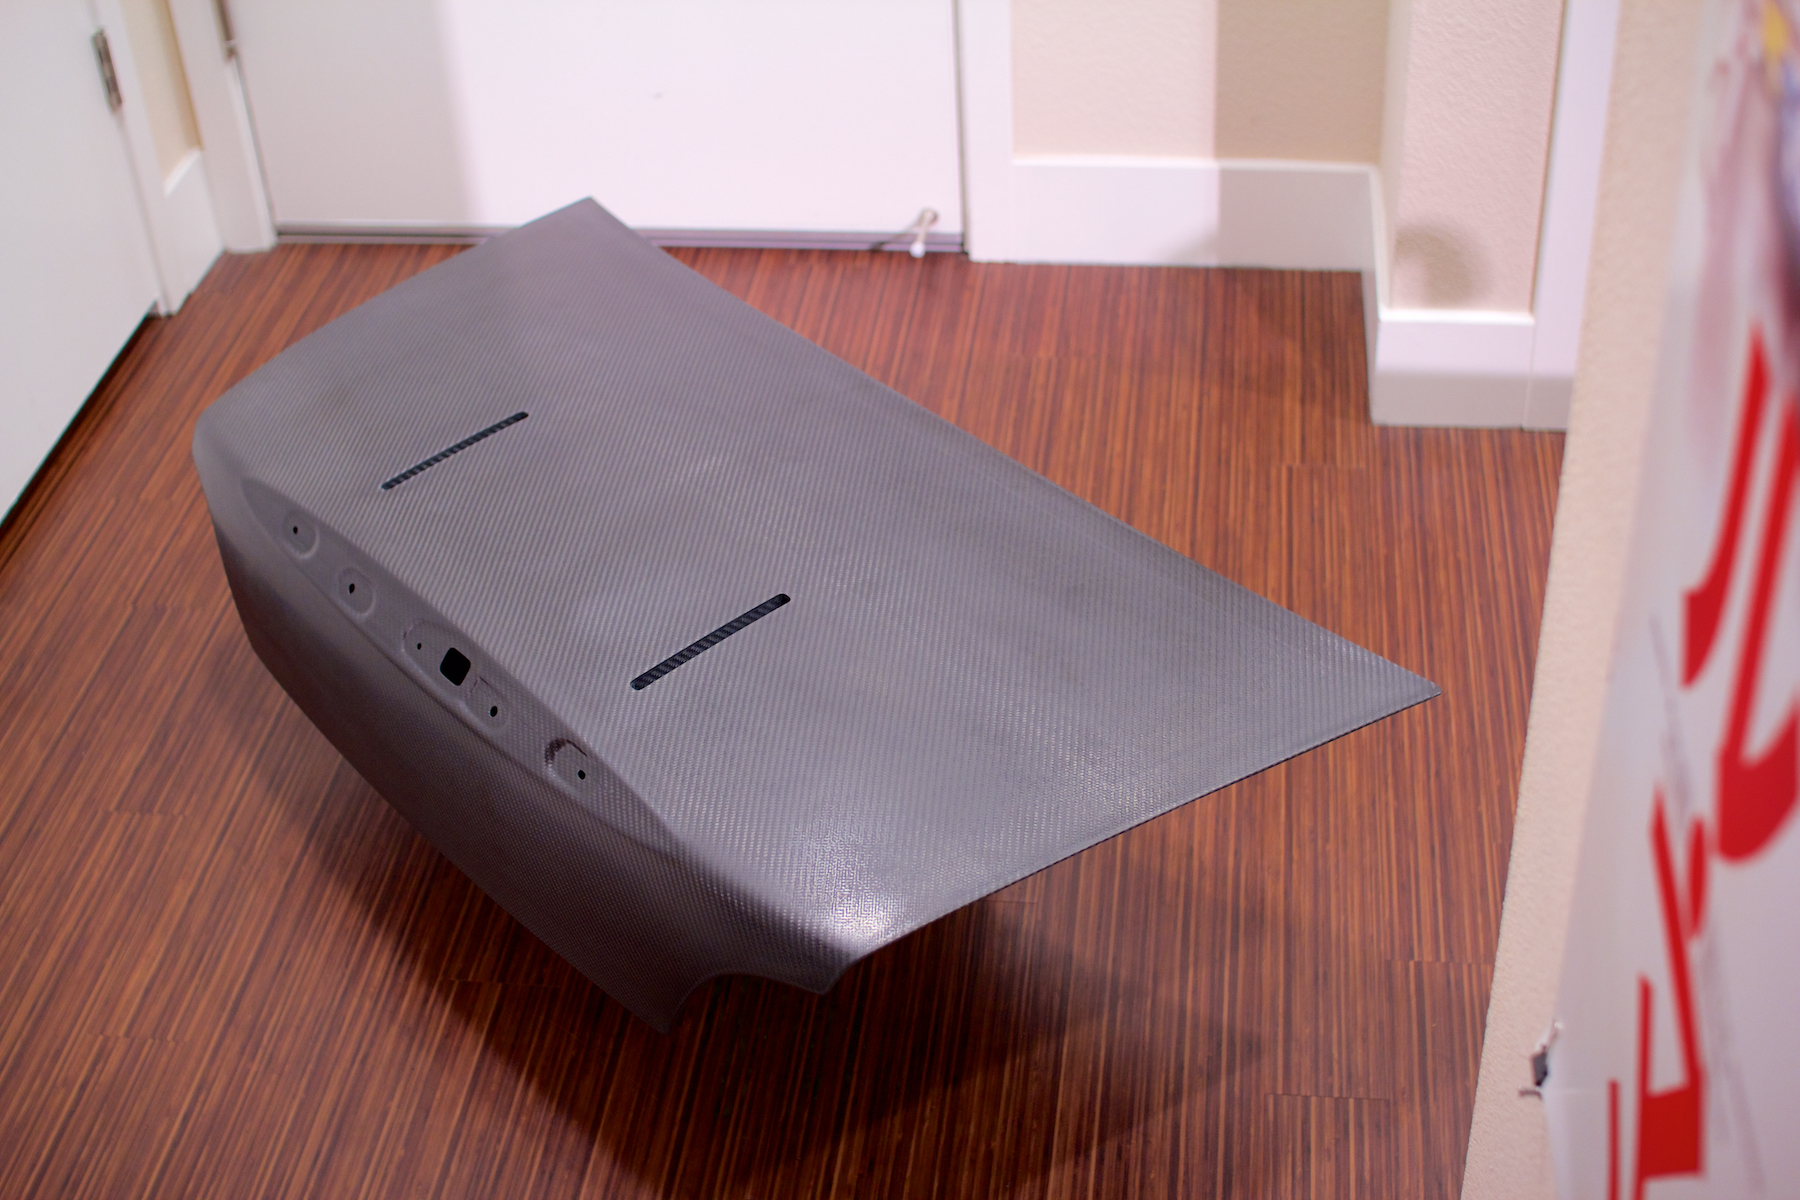
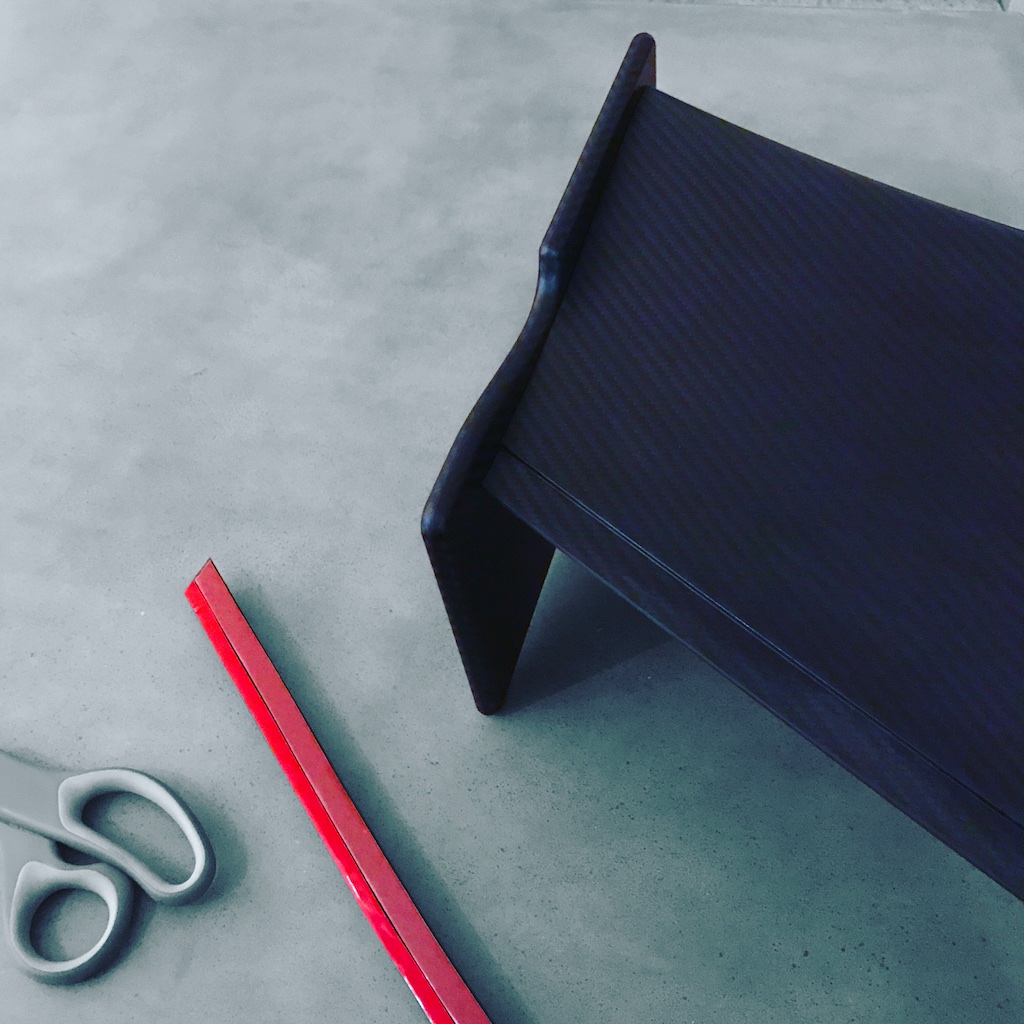
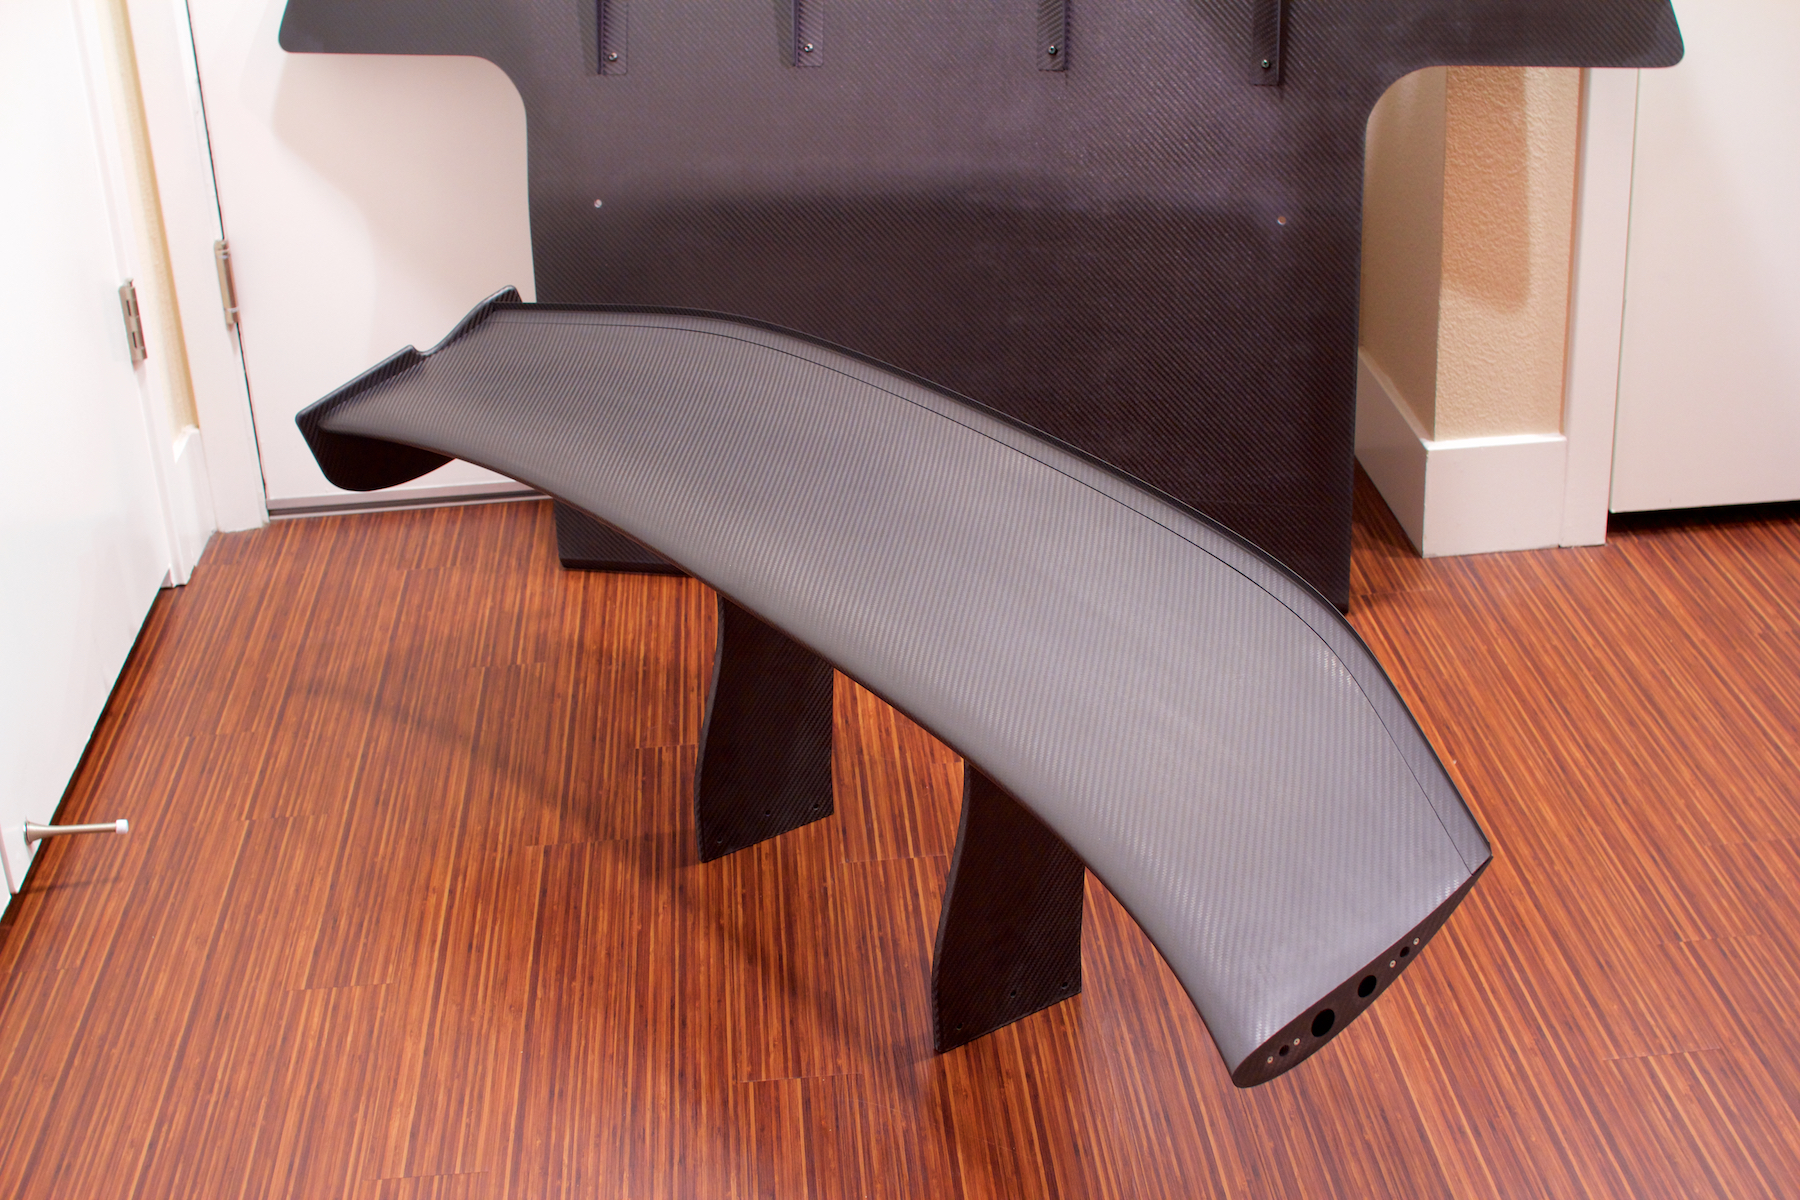
ASM GT-09 dry carbon trunk + wing
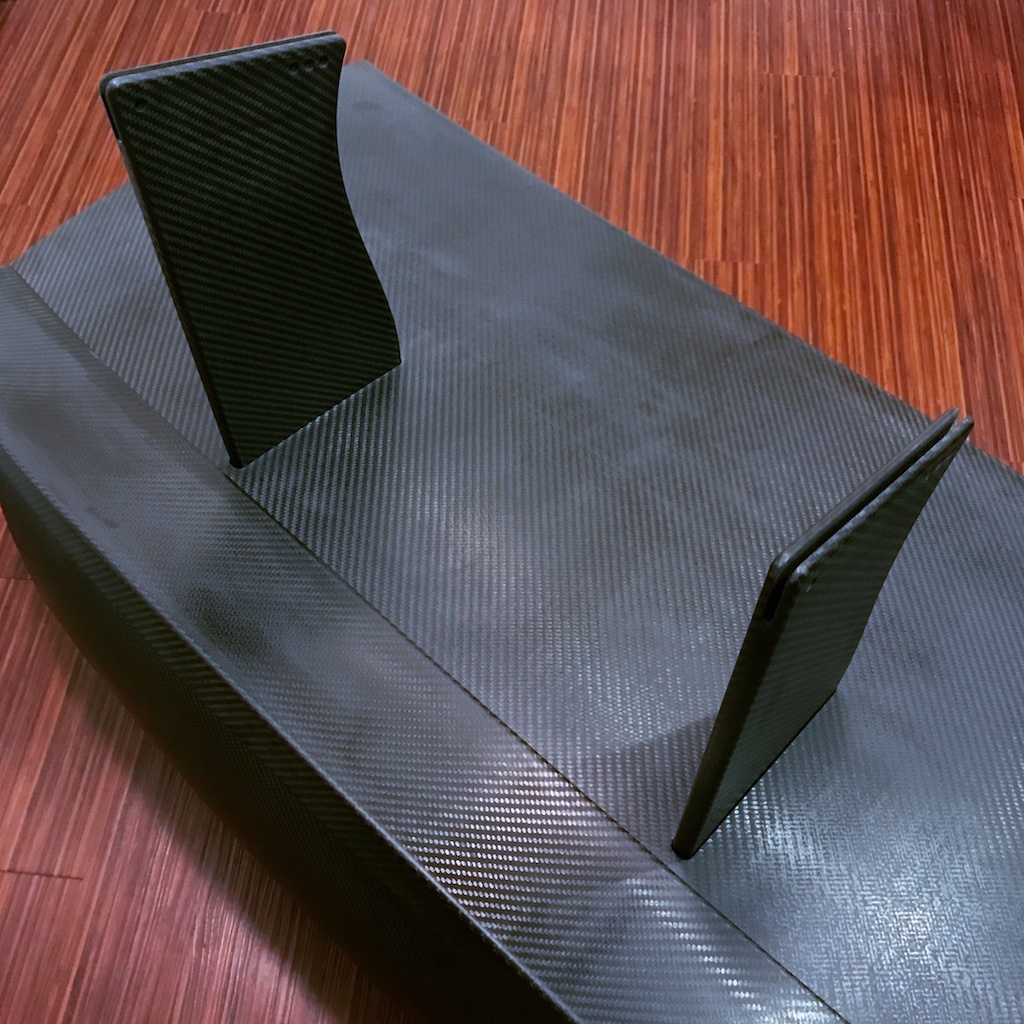
Have dreamed of this one since the first time I saw on ASM's blog all those years ago. Thanks to some great people in Japan I was able to get them to make me one of my own. After waiting about 2 months I received it and it is glorious. I plan on painting the trunk similar to how my hood is painted, with the interior remaining in the carbon finish, as well as the wing. I want to come up with a good solution for fill pieces I can use when I don't want to use the wing. I am thinking some carbon pieces that are just trimmed down could work well if the tolerances are small, but I do need to actually be able to remove them as well. I think I could put some grooved sections on the top surface so they still sit flush but can be pulled out with simple tools.
Anyway, I am in contact with the body shop and this should all be happening soon depending on their schedule. Once I realized this trunk was a possibility I wanted to hold off on painting the bumper until I could do the trunk and bumper at the same time, sorry for the delay on that.
In the meantime, here are some photos of one of the nicest car parts I have ever laid my eyes on.
The trunk is super cool, the way the wing mounts are sandwiched between the outer shell and inner frame is really smart. And there is a lot of surface area around the mounts to support them. And looking at them in detail, I think i could even add attachment points inside the actual trunk to fully brace the force of the wing into the chassis. Not really necessary, but would be very cool to do in a way that is removable.
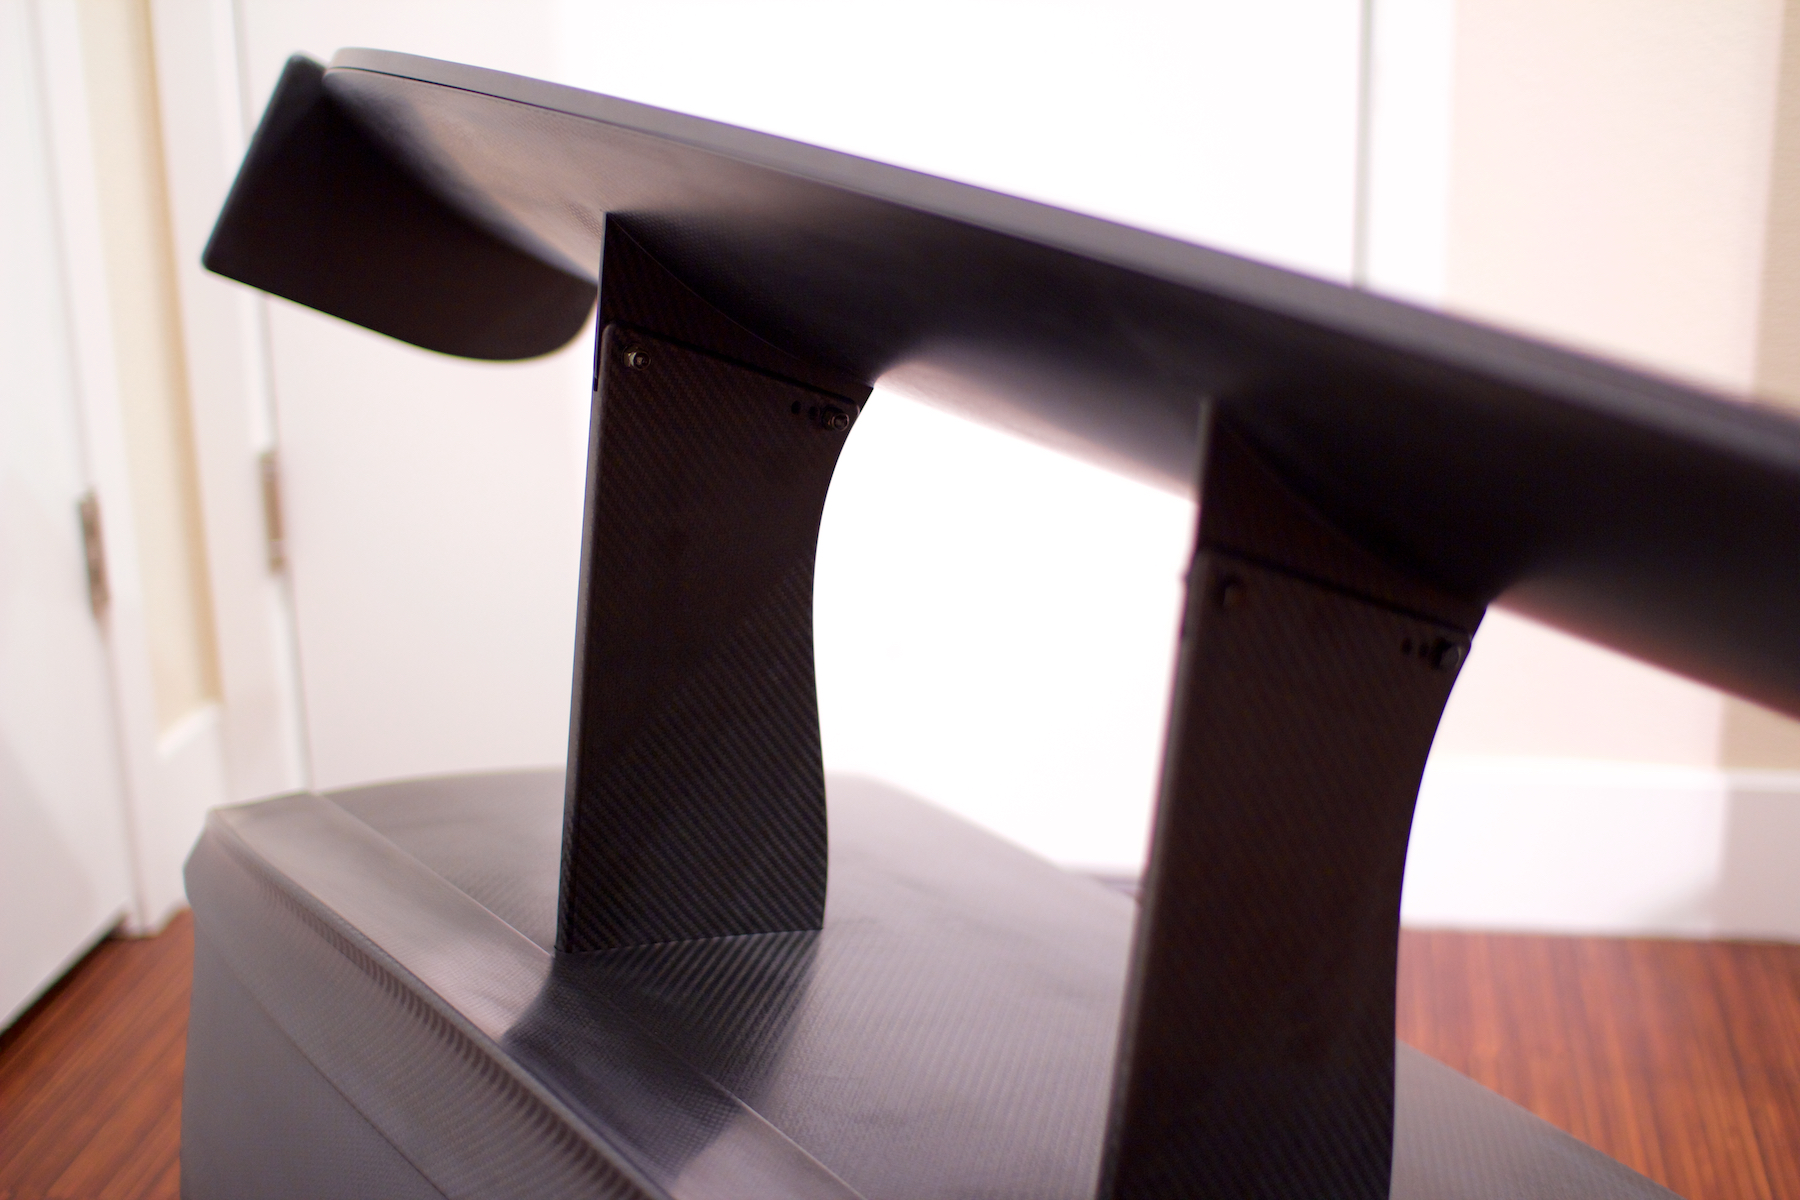
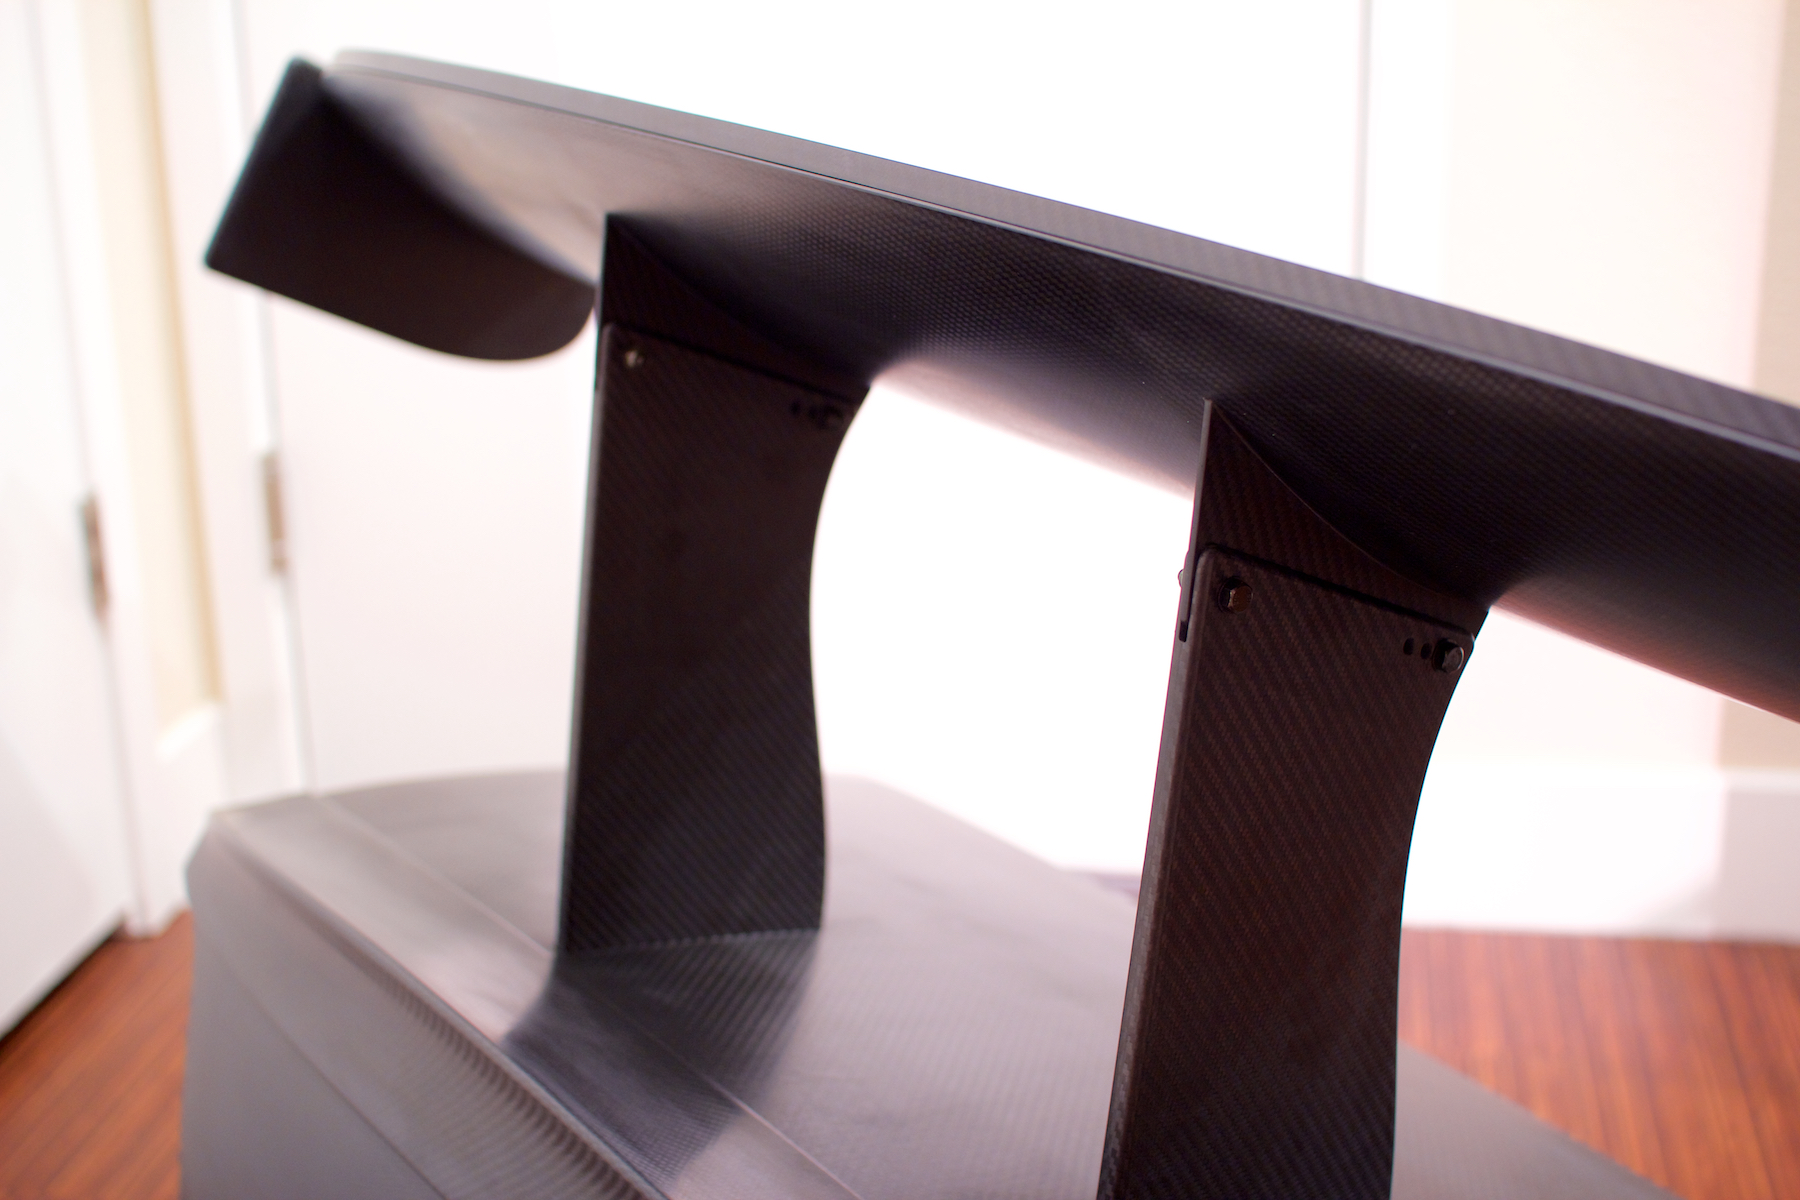
The wing itself is absolutely incredible. It has 5 levels of adjustment, I will have to put it on the car to see exactly at what angle of attack it sits once installed, but there is a very nice range there. The endplates are beautifully made and the details like theinset gurney flap are crazy. The trailing edge actually as a tiny inset that the gurney flap seats into so it is exactly level with the rest of the wing surface when it is installed with the included mounting tape. The way the wing slots into the tops of the wing stands is also very cool, and wasn't something I realized until I got everything. It is all so precise and everything fits so perfectly together. The wing and stands are very easy to install and remove from the trunk.
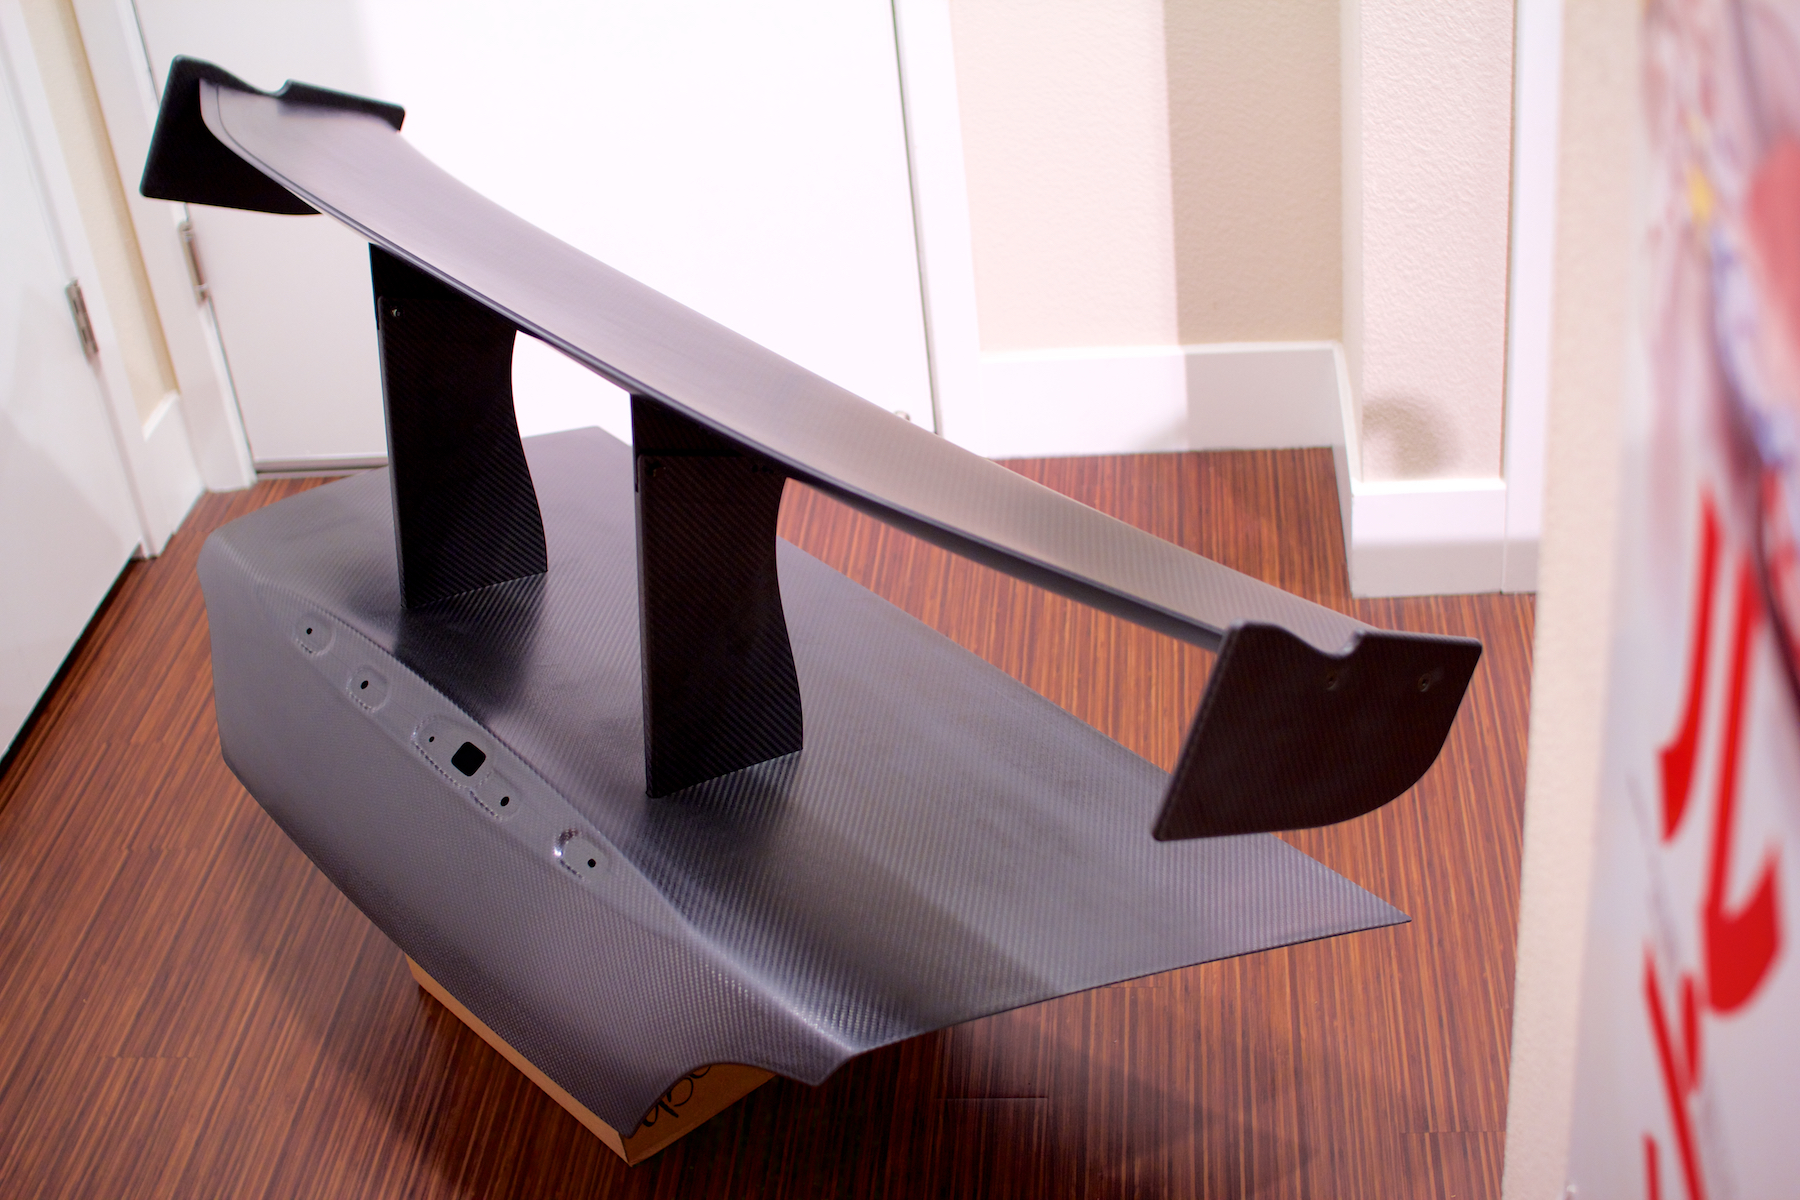
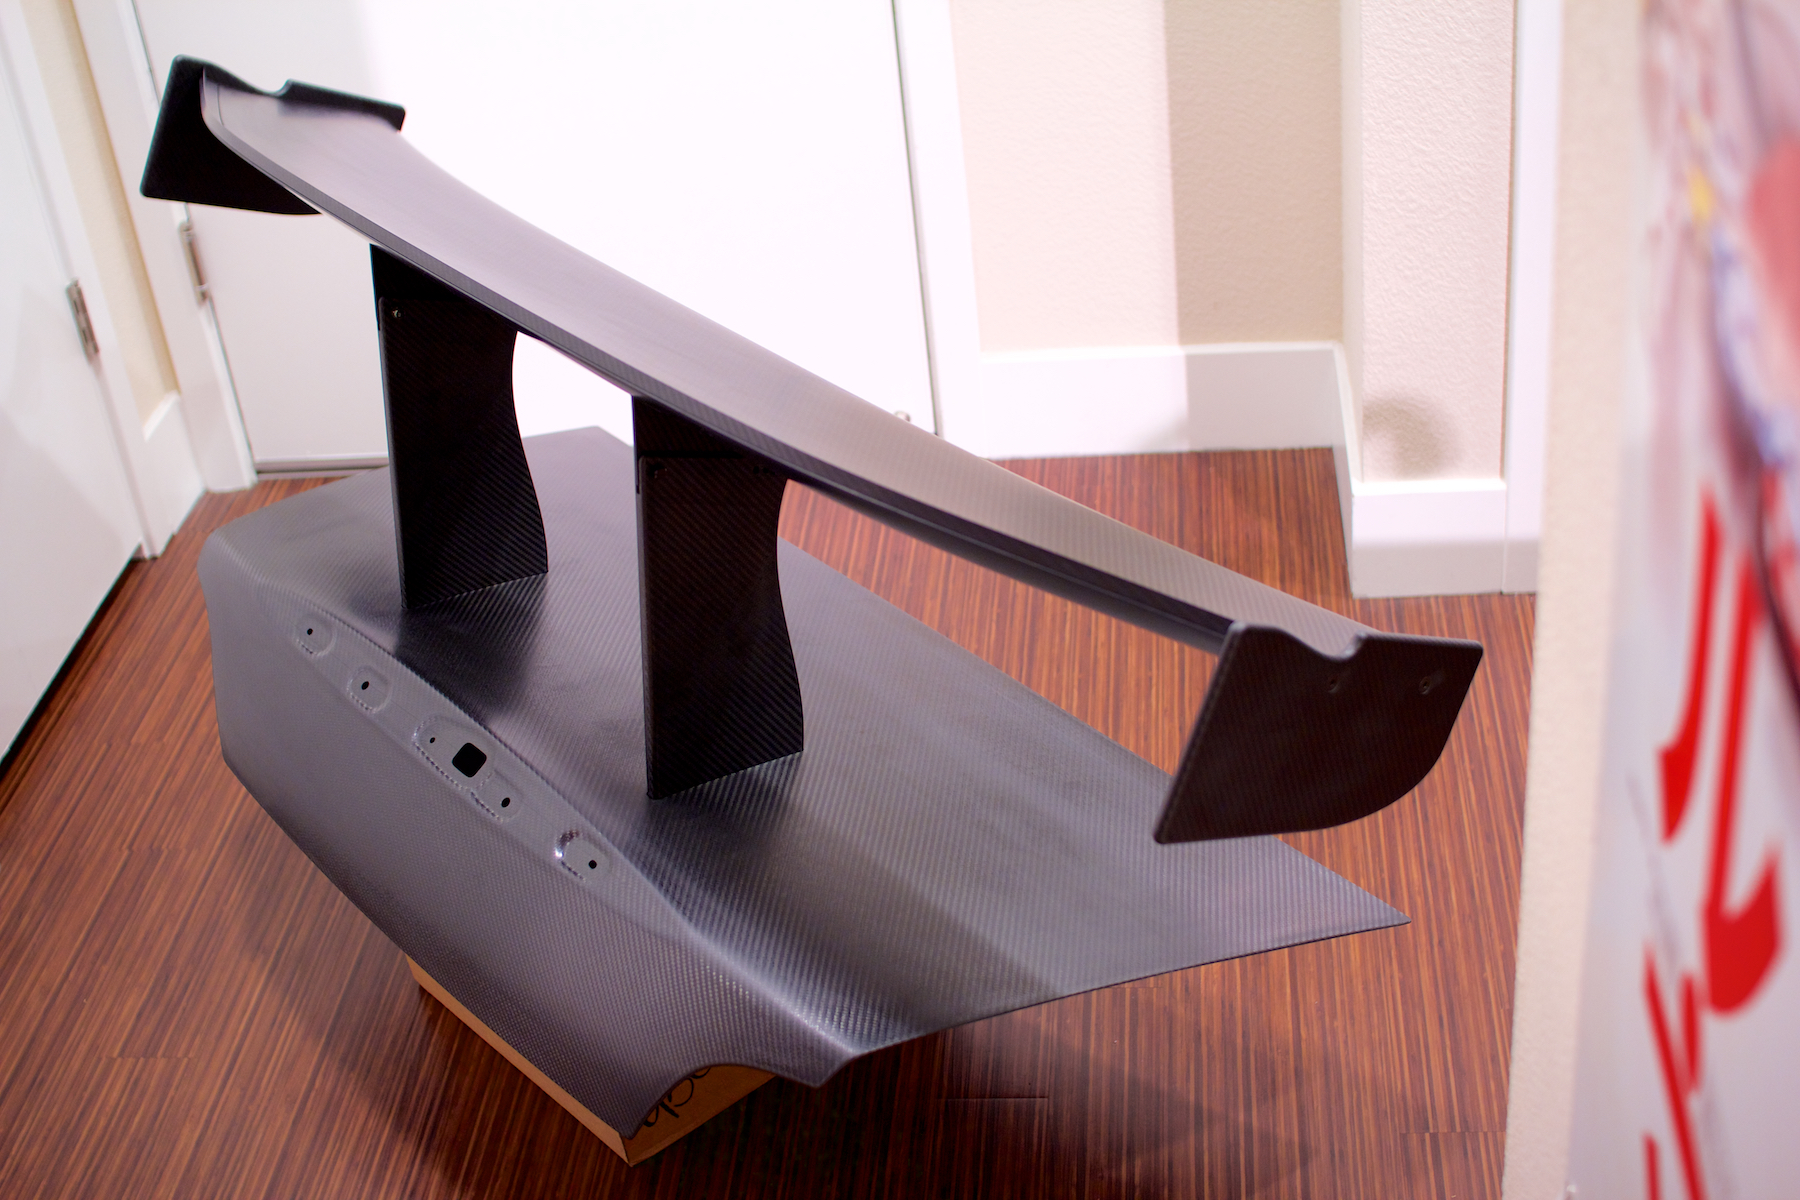
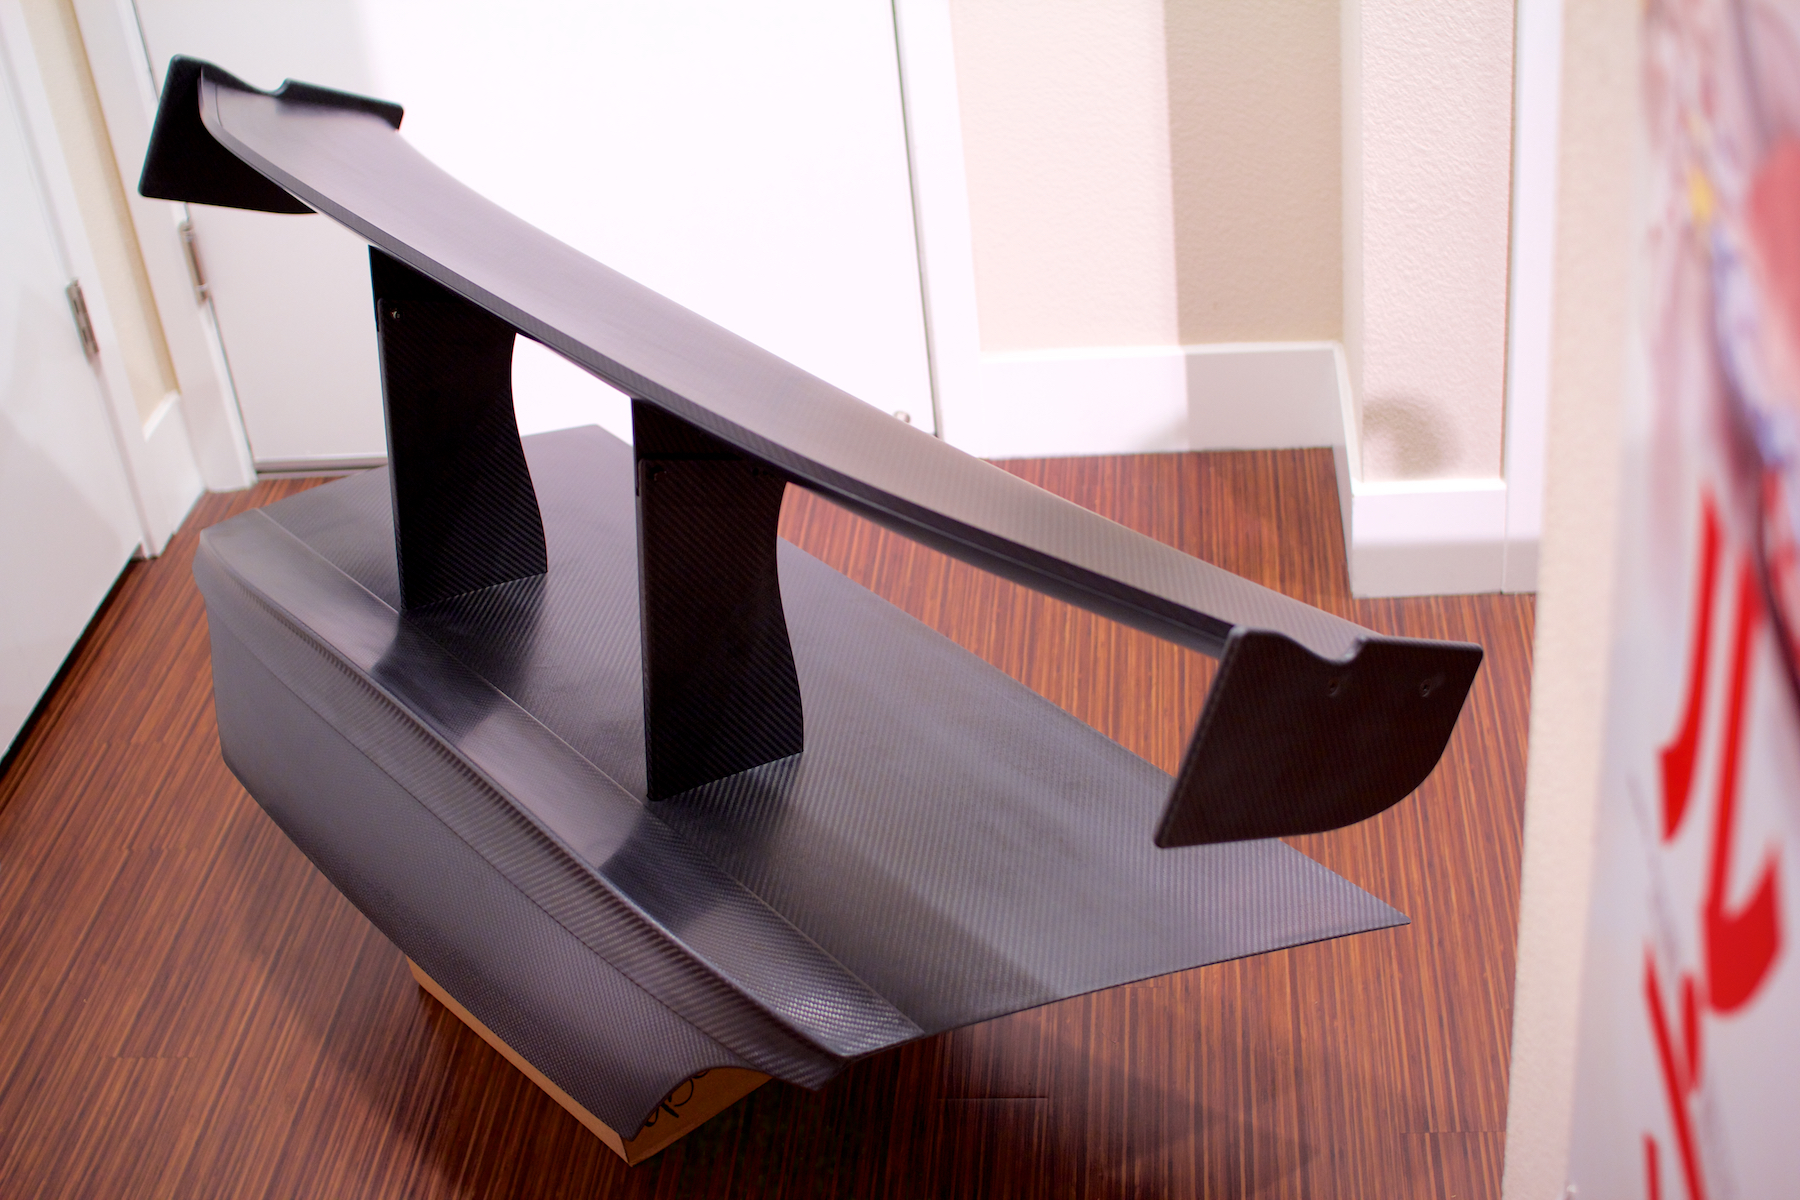
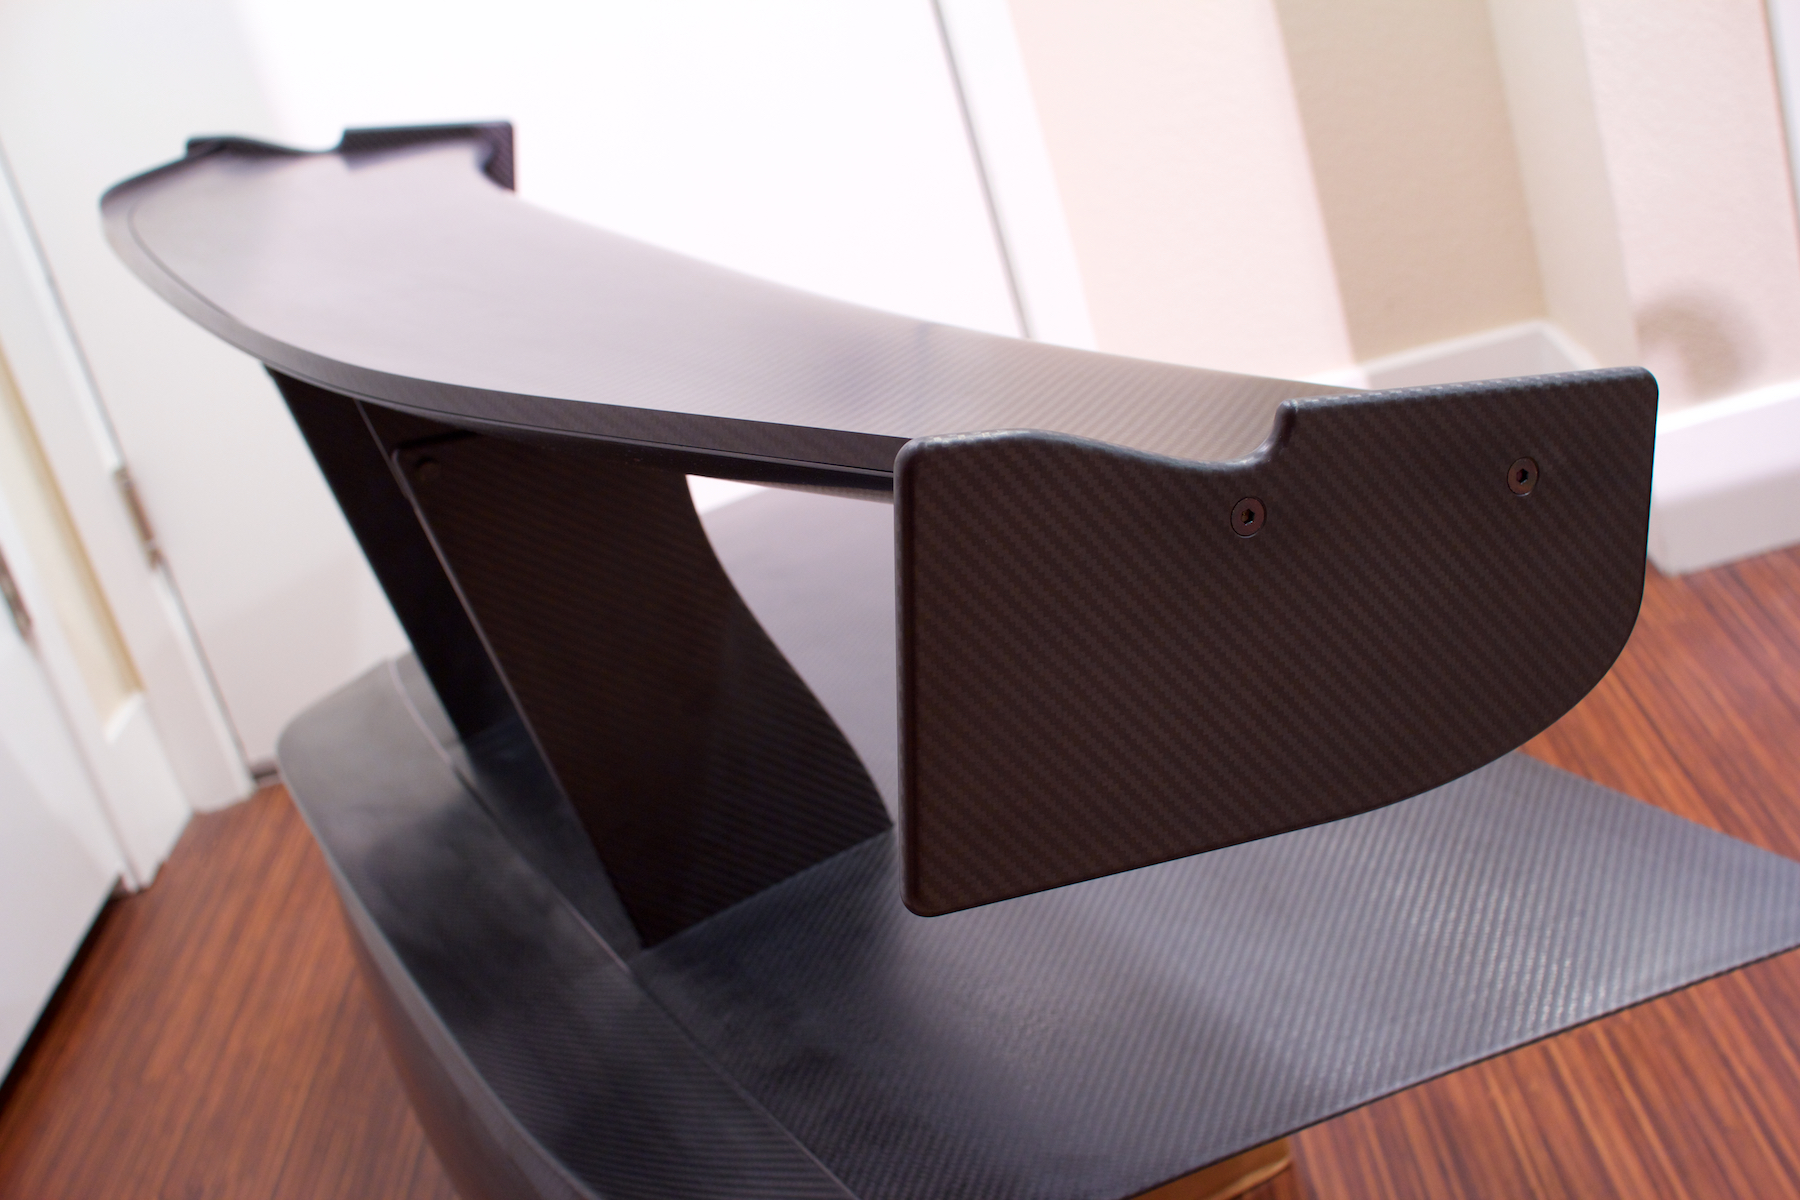
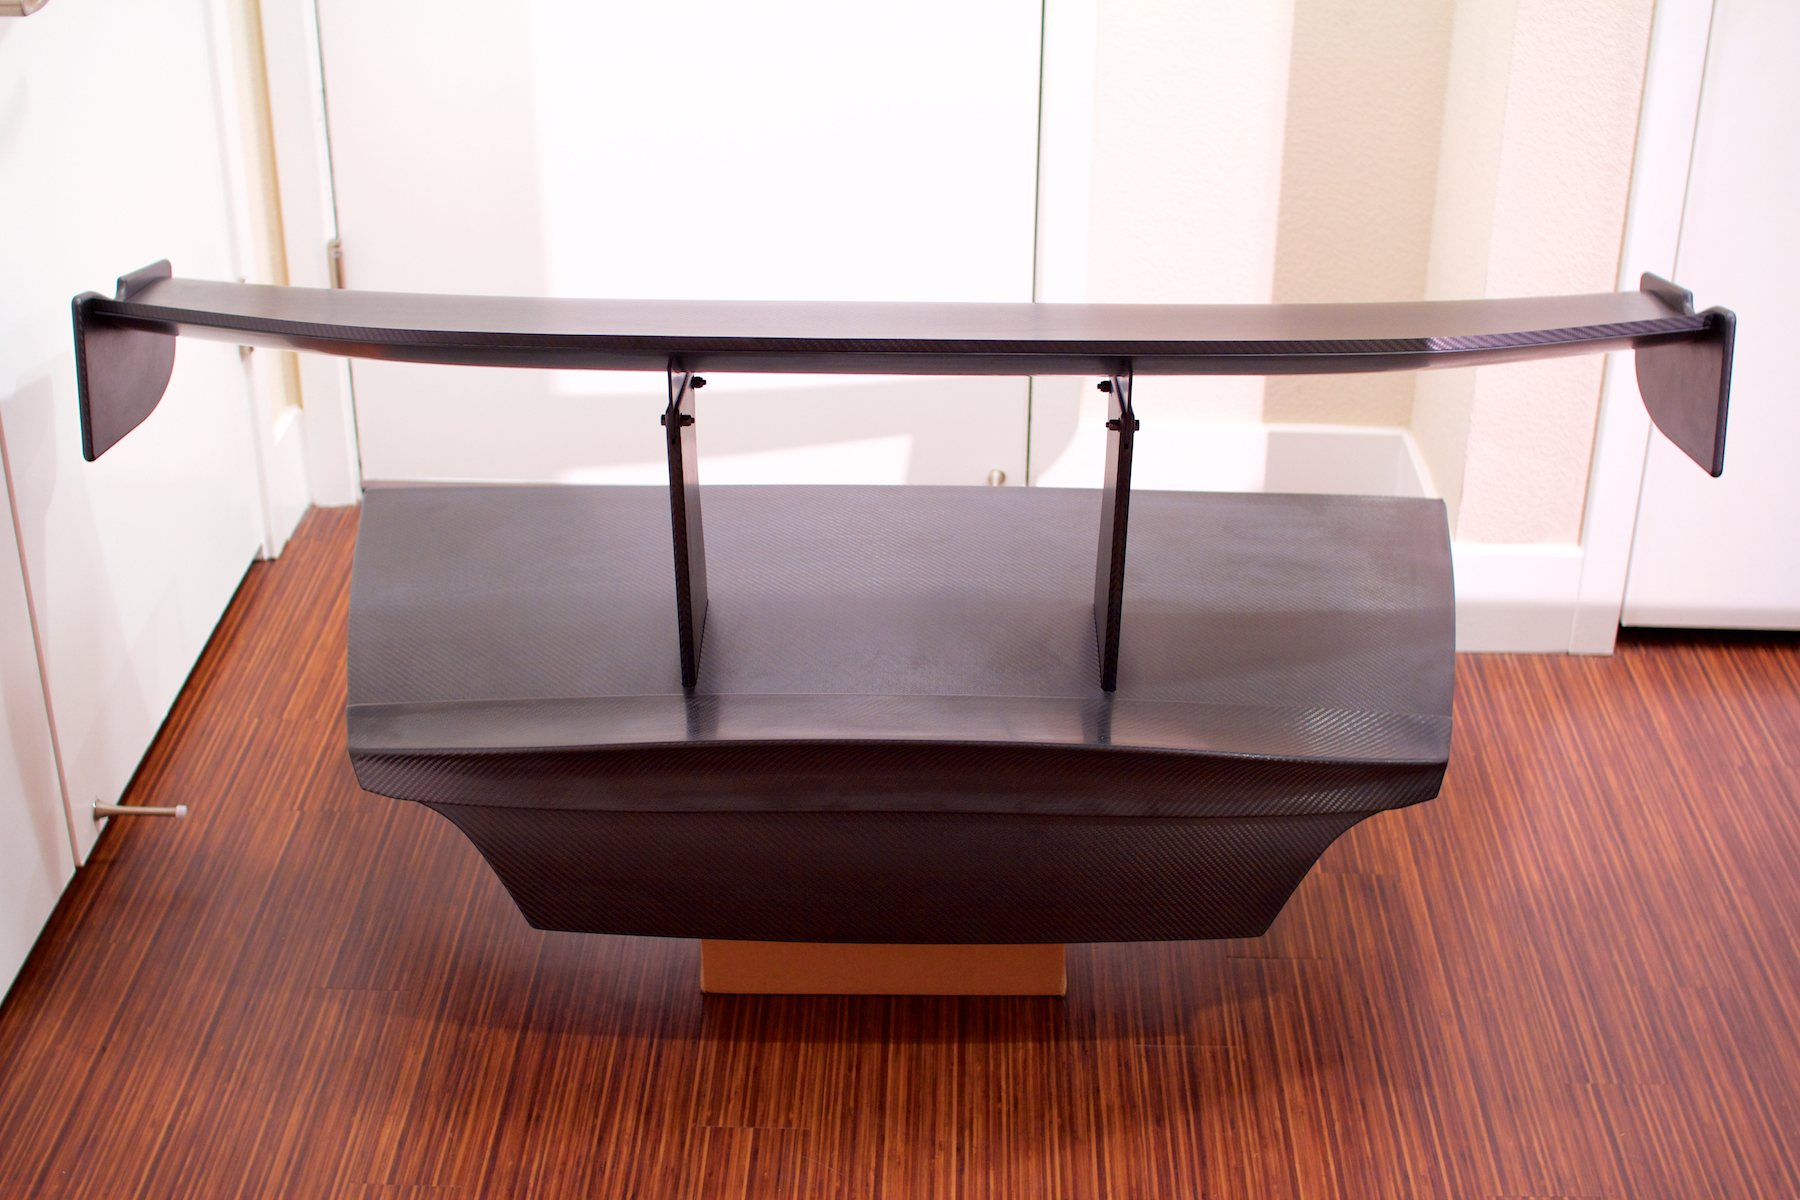
I really like the dry carbon finish of the wing. I don't think I will worry about clear coating it and just make sure it is well protected. I think the carbon wing should look fantastic on the the car with black hardtop.
For the rear duckbill I think I like this look:
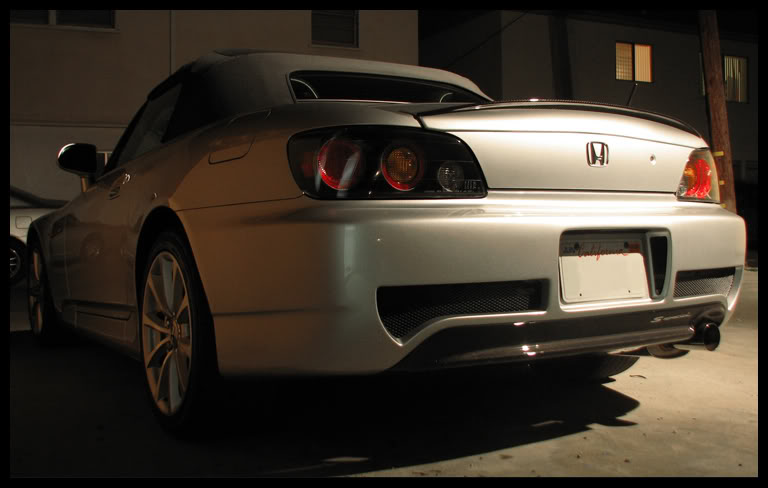
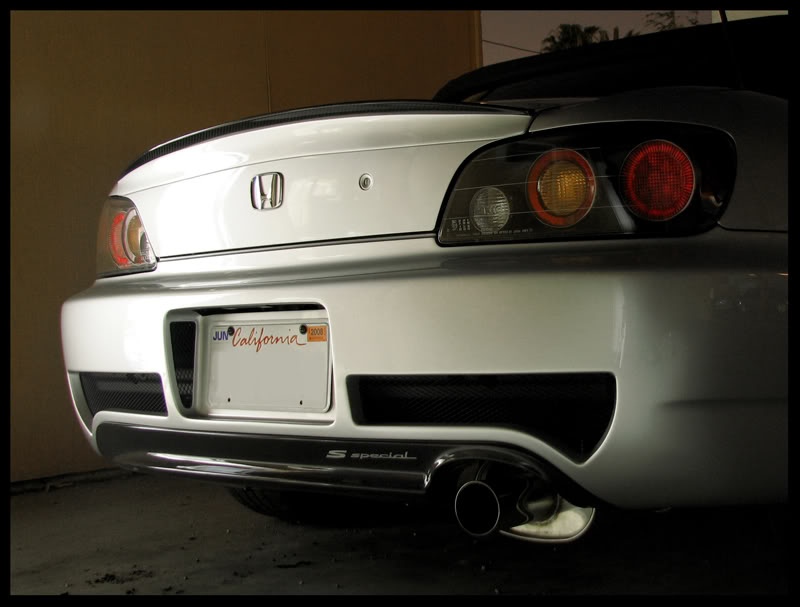
Combined with the ASM rear bumper it all works very well together without calling too much attention to itself.
And for those that follow me on Instagram, you will remember seeing 3 ASM carbon fiber packages heading my way, and I will say that all these parts fit in two boxes.
Have dreamed of this one since the first time I saw on ASM's blog all those years ago. Thanks to some great people in Japan I was able to get them to make me one of my own. After waiting about 2 months I received it and it is glorious. I plan on painting the trunk similar to how my hood is painted, with the interior remaining in the carbon finish, as well as the wing. I want to come up with a good solution for fill pieces I can use when I don't want to use the wing. I am thinking some carbon pieces that are just trimmed down could work well if the tolerances are small, but I do need to actually be able to remove them as well. I think I could put some grooved sections on the top surface so they still sit flush but can be pulled out with simple tools.
Anyway, I am in contact with the body shop and this should all be happening soon depending on their schedule. Once I realized this trunk was a possibility I wanted to hold off on painting the bumper until I could do the trunk and bumper at the same time, sorry for the delay on that.
In the meantime, here are some photos of one of the nicest car parts I have ever laid my eyes on.
The trunk is super cool, the way the wing mounts are sandwiched between the outer shell and inner frame is really smart. And there is a lot of surface area around the mounts to support them. And looking at them in detail, I think i could even add attachment points inside the actual trunk to fully brace the force of the wing into the chassis. Not really necessary, but would be very cool to do in a way that is removable.
The wing itself is absolutely incredible. It has 5 levels of adjustment, I will have to put it on the car to see exactly at what angle of attack it sits once installed, but there is a very nice range there. The endplates are beautifully made and the details like theinset gurney flap are crazy. The trailing edge actually as a tiny inset that the gurney flap seats into so it is exactly level with the rest of the wing surface when it is installed with the included mounting tape. The way the wing slots into the tops of the wing stands is also very cool, and wasn't something I realized until I got everything. It is all so precise and everything fits so perfectly together. The wing and stands are very easy to install and remove from the trunk.
I really like the dry carbon finish of the wing. I don't think I will worry about clear coating it and just make sure it is well protected. I think the carbon wing should look fantastic on the the car with black hardtop.
For the rear duckbill I think I like this look:
Combined with the ASM rear bumper it all works very well together without calling too much attention to itself.
And for those that follow me on Instagram, you will remember seeing 3 ASM carbon fiber packages heading my way, and I will say that all these parts fit in two boxes.
-
Cpt. Spock
- 9000rpm
- Posts: 32
- Joined: Nov 2016
#251
 OH MAH GAHHHH...cant wait to see the finished rear end *giggity*
and +1 for the trunk lid spoiler color scheme. That will look super good if you're planning on doing the rear bumper the same as the picture you posted.
and +1 for the trunk lid spoiler color scheme. That will look super good if you're planning on doing the rear bumper the same as the picture you posted.
-
andrewhake
- Admin
- Posts: 580
- Joined: Oct 2016
- Location: Mt. __________
- Contact: YouTube IG
#252
Actually just found some 1/2" neoprene sheets I can cut to the appropriate size that should fit and seal the slots quite well and seal everything nicely when removing the wing.
If I end up doing carbon inserts I could find some way to spring load them when bolted in and when bolts are removed they sort of pop up to be removed. Maybe.
If I end up doing carbon inserts I could find some way to spring load them when bolted in and when bolts are removed they sort of pop up to be removed. Maybe.
-
andrewhake
- Admin
- Posts: 580
- Joined: Oct 2016
- Location: Mt. __________
- Contact: YouTube IG
#253
Found some torx security bolts and "sex nuts" (LOL) to use to mount the wing to the stands. They are essentially bolts with threads on the inside instead of outside, so I can have more aero friendly button head bolts that don't stick out nearly as much. And mainly will just look nicer.


https://www.accu.co.uk/en/female-securi ... 4-10-A2-BL
A very slightly more aerodynamically friendly way to mount the wing element to the stands, and a little more secure than the included hex head bolts. and nuts. I will use the washers I got with the wing as well.
https://www.accu.co.uk/en/female-securi ... 4-10-A2-BL
A very slightly more aerodynamically friendly way to mount the wing element to the stands, and a little more secure than the included hex head bolts. and nuts. I will use the washers I got with the wing as well.
-
andrewhake
- Admin
- Posts: 580
- Joined: Oct 2016
- Location: Mt. __________
- Contact: YouTube IG
#254
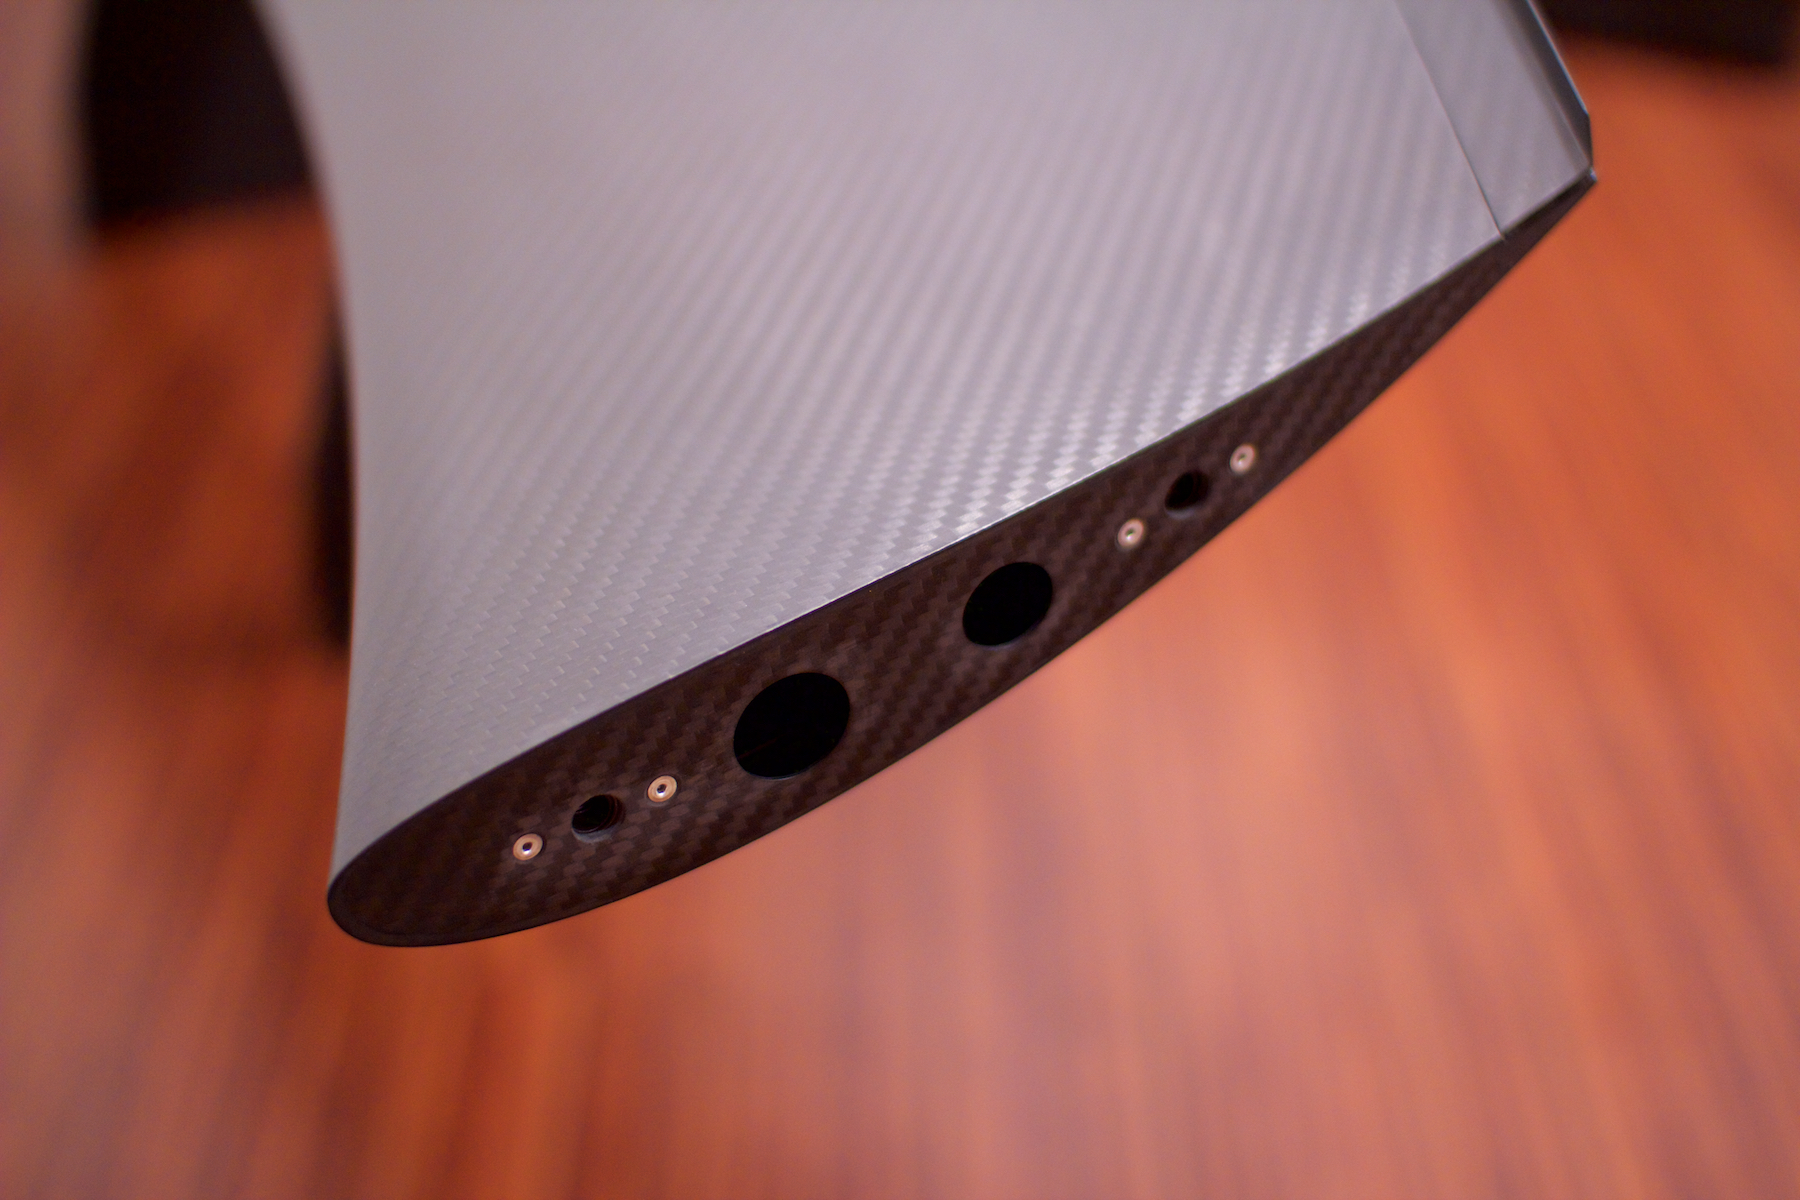
Got the gurney flap installed onto the wing element. It is so cool how they made the recess for the gurney flap the exact right size to match the thickness of the gurney and the mounting tape. Very simple to mount, just slots right into place.
Also decided to put some Loctite 242 on the endplate mounting hardware, so here are some photos with them removed so you can see the shape of the wing element. I think it works out to be just about neutral in terms of weight on all this stuff. The width of the wing is 1450mm (included the endplates, 1430mm wing surface width), depth is 287mm in the center, 230mm at the ends. The wing stands are around 280mm tall from surface of the trunk.
The trunk weighs 6.4lbs, and the entire wing assembly weighs 6.4lbs. Would be interesting to know how much something like a Voltex Type 7 weighs in comparison. The best part about this wing and mounting setup is that there just isn't any side to side wobble, even mounted as high as it is.
Oh and there is also something else behind that wing..
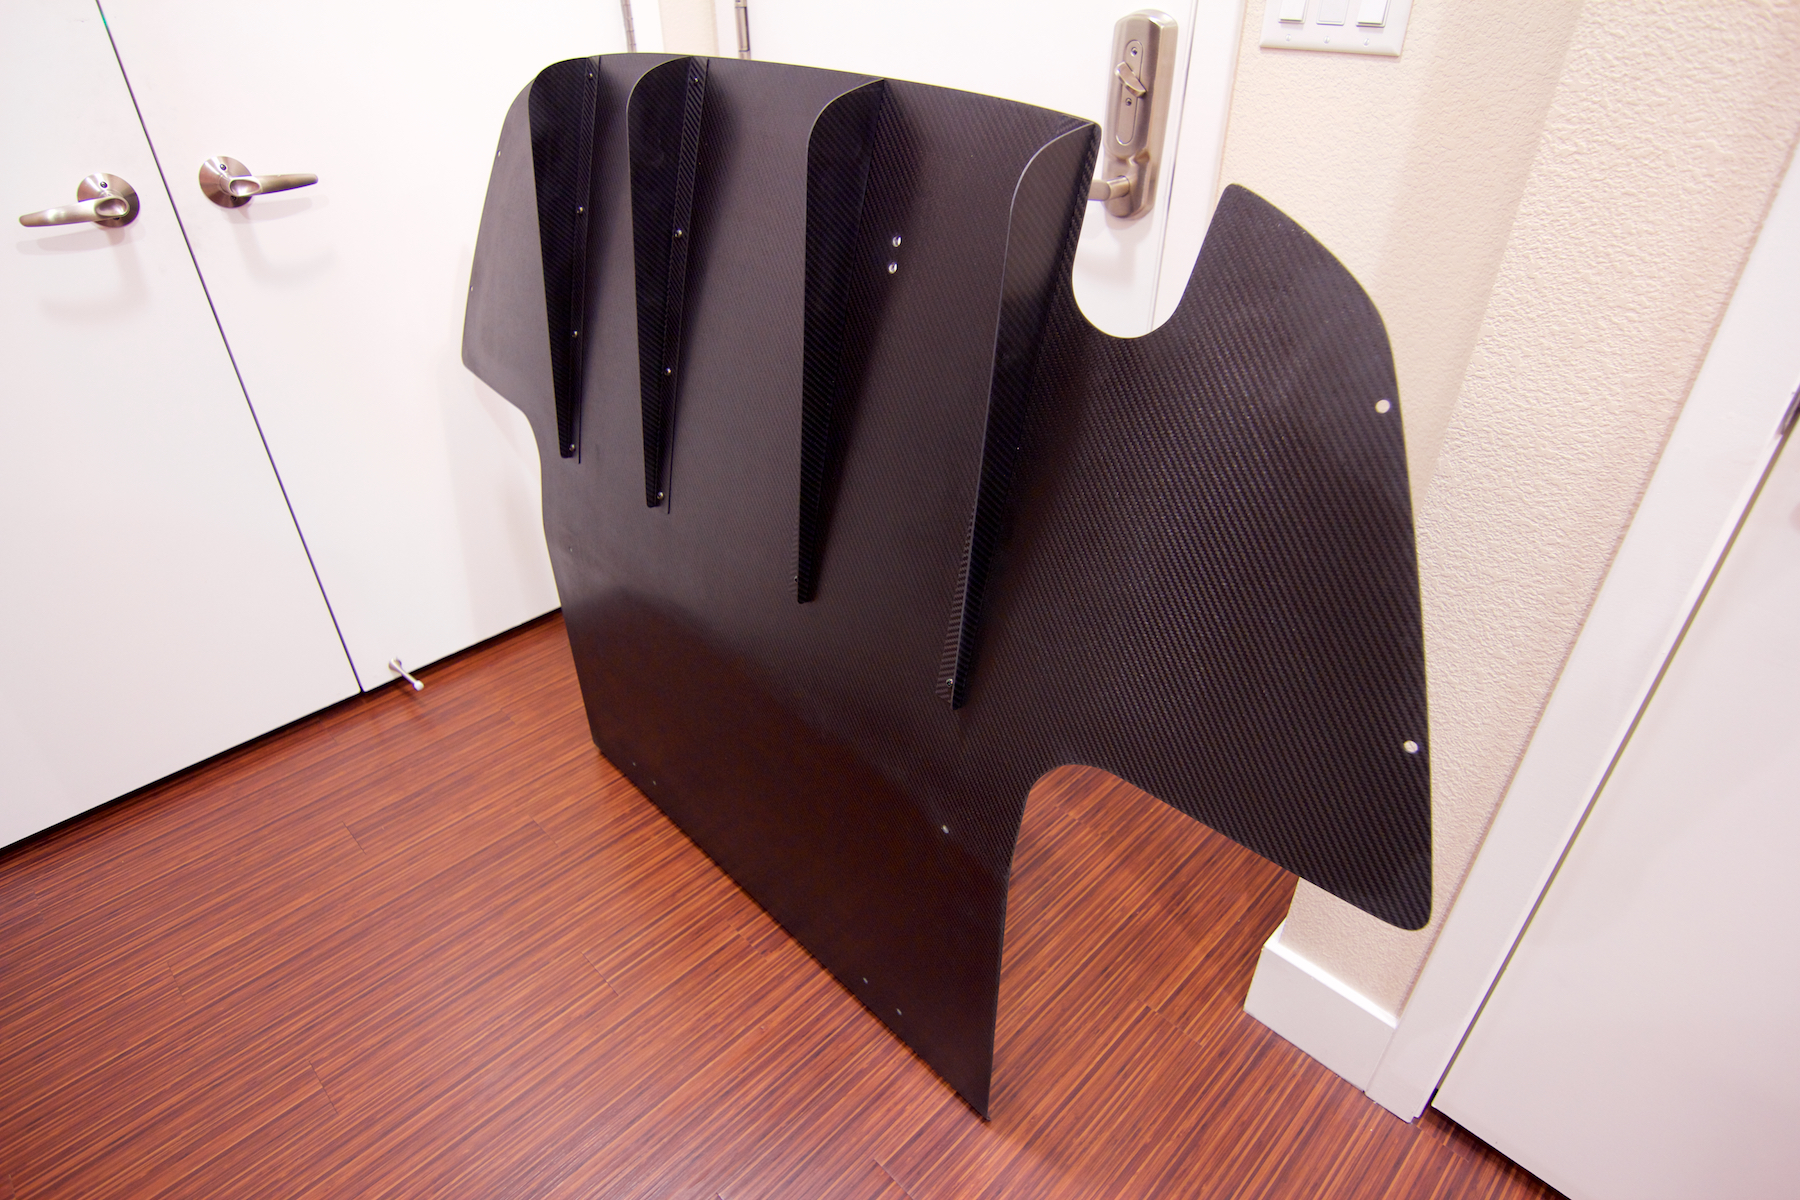
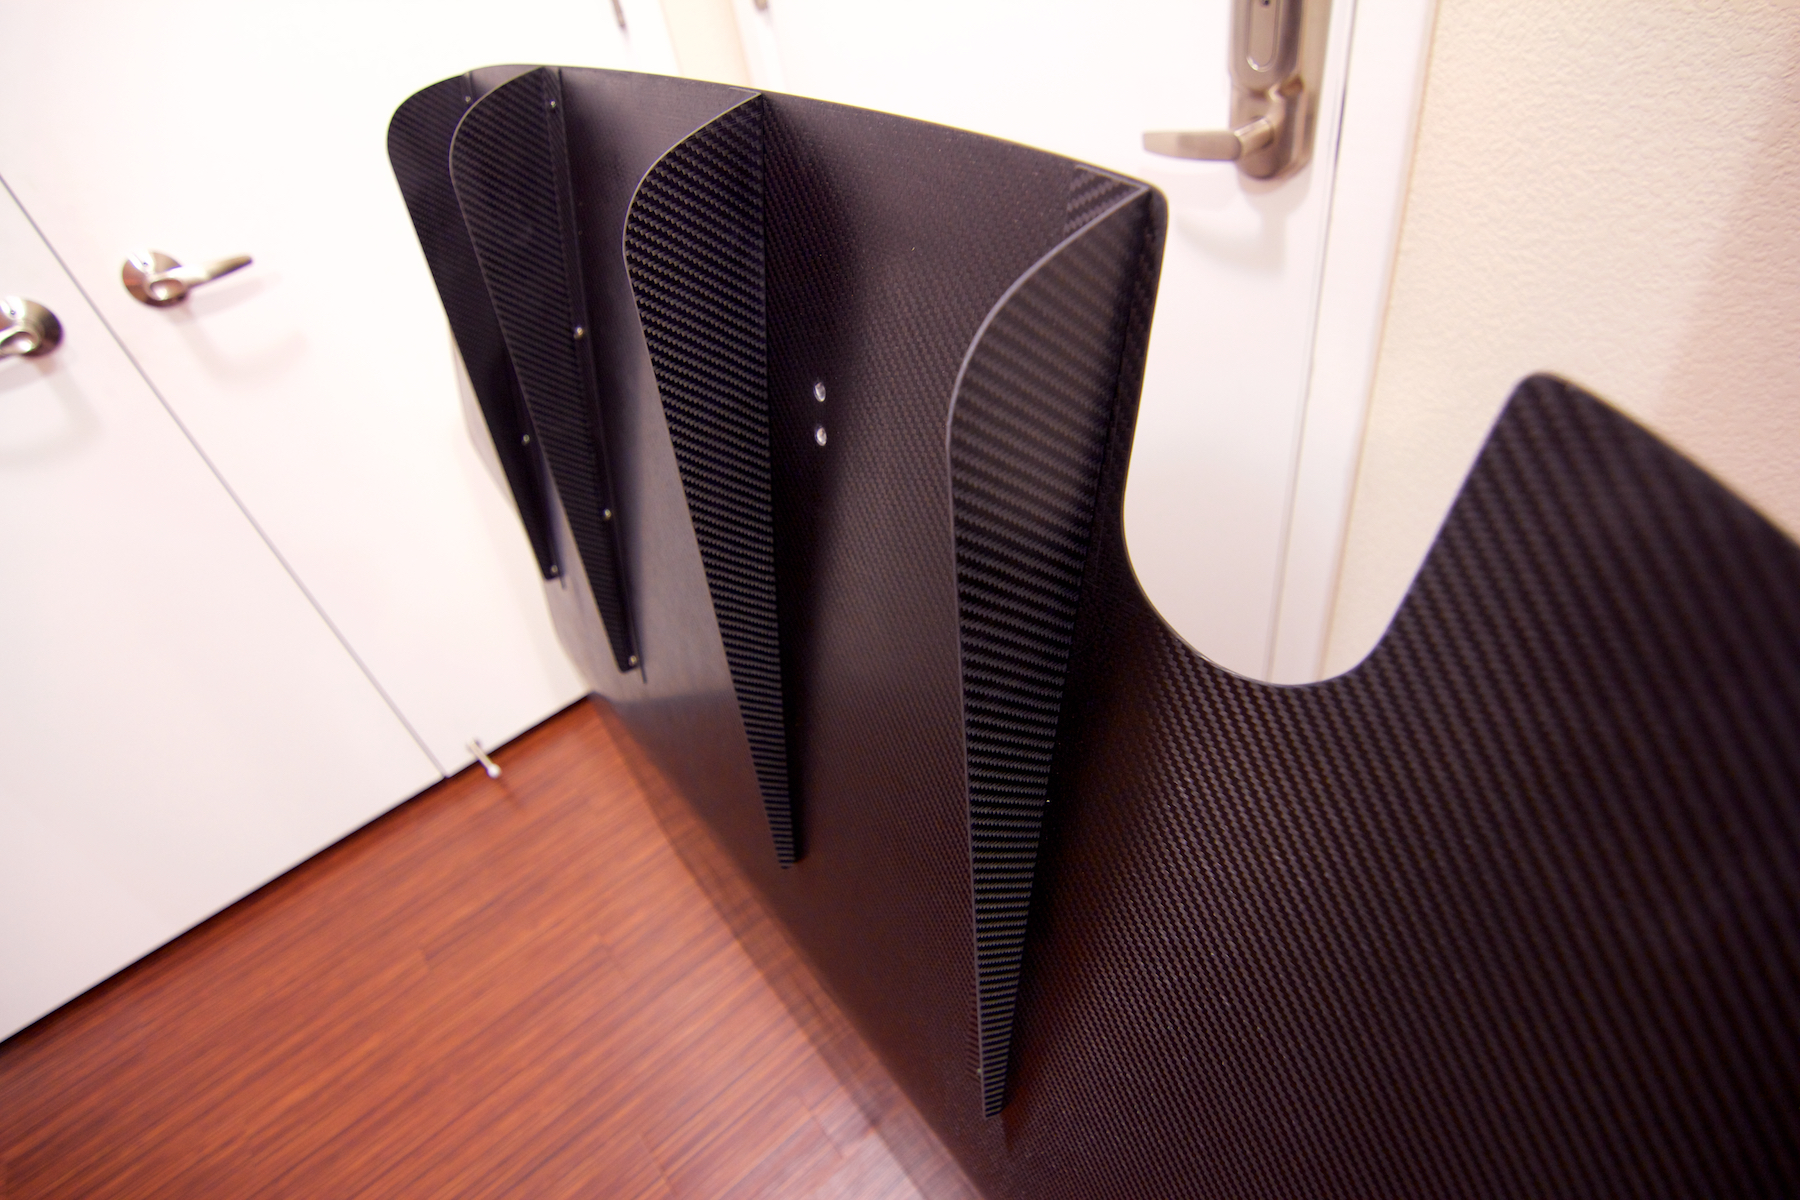
ASM rear diffuser
Ooohweee that is a lot of carbon fiber!
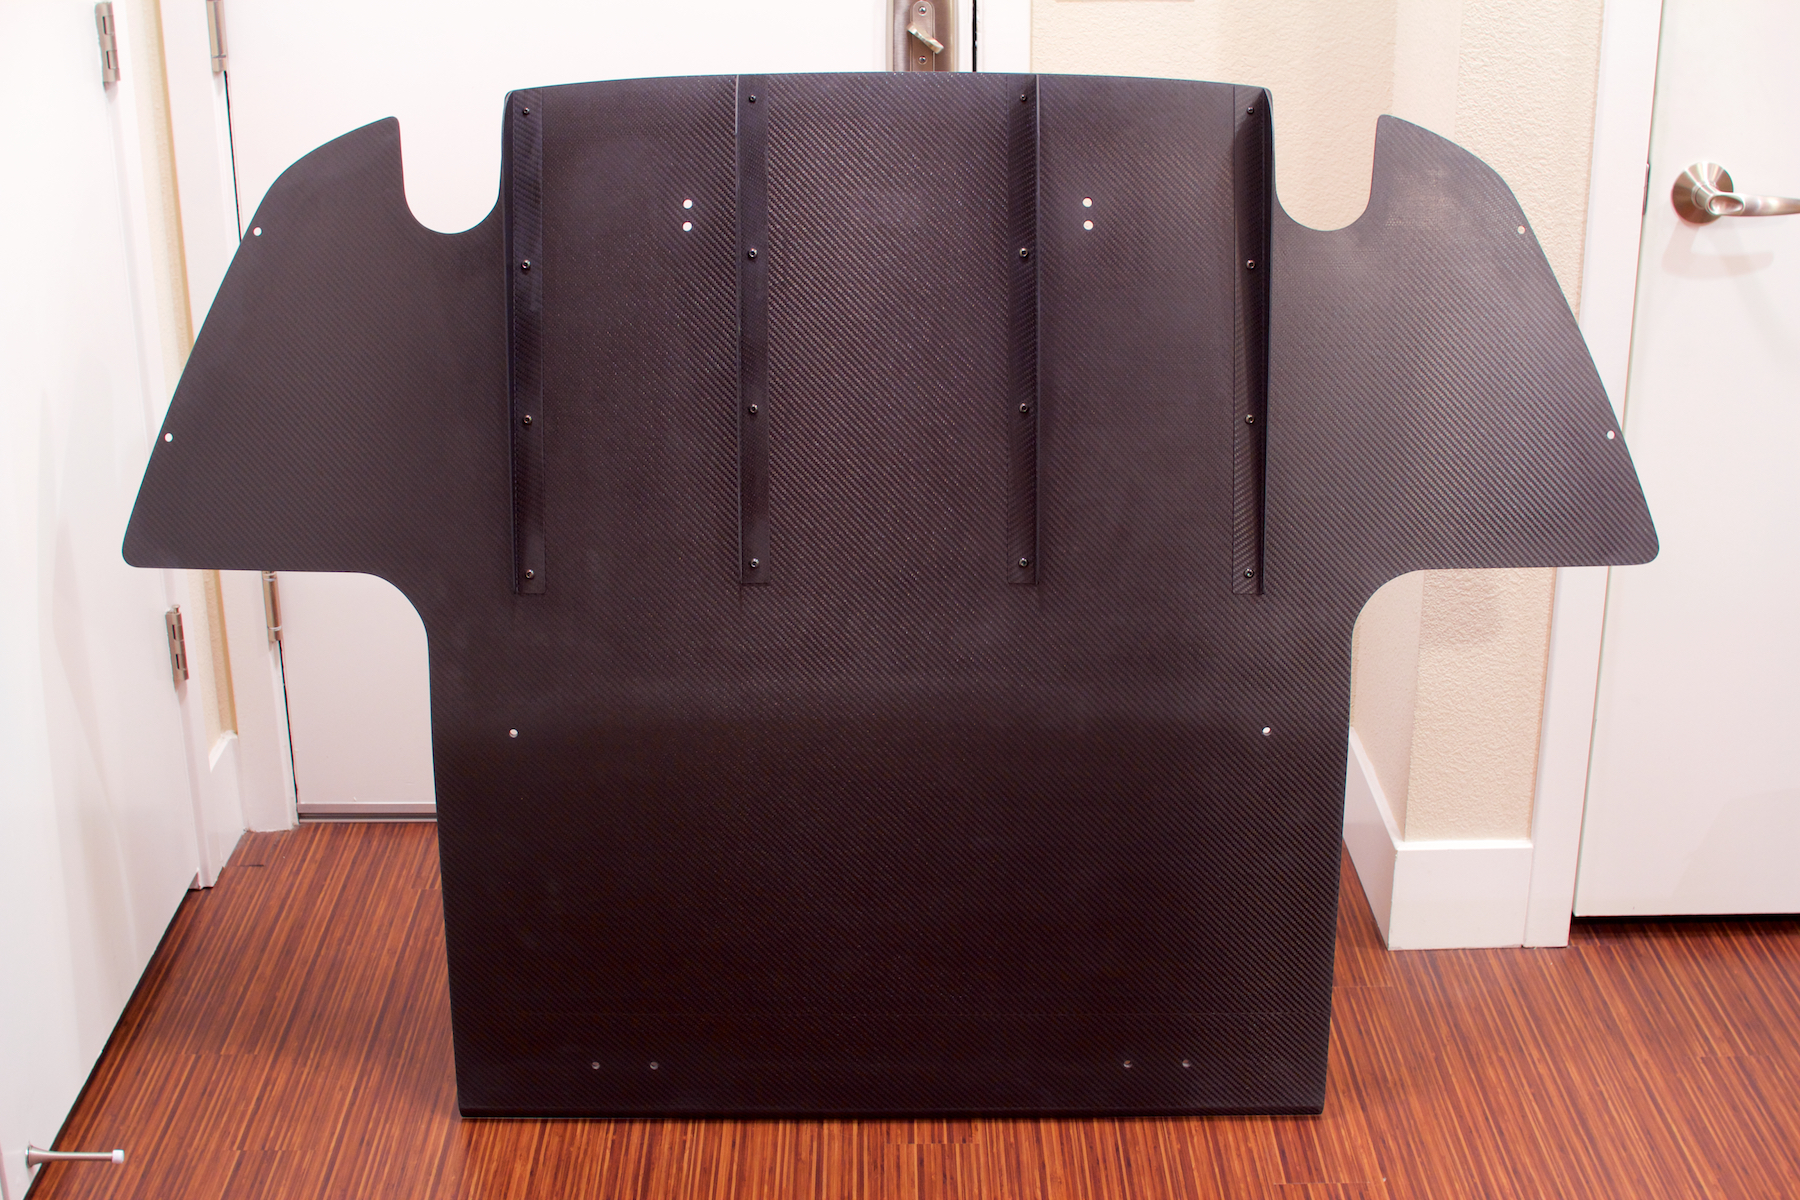
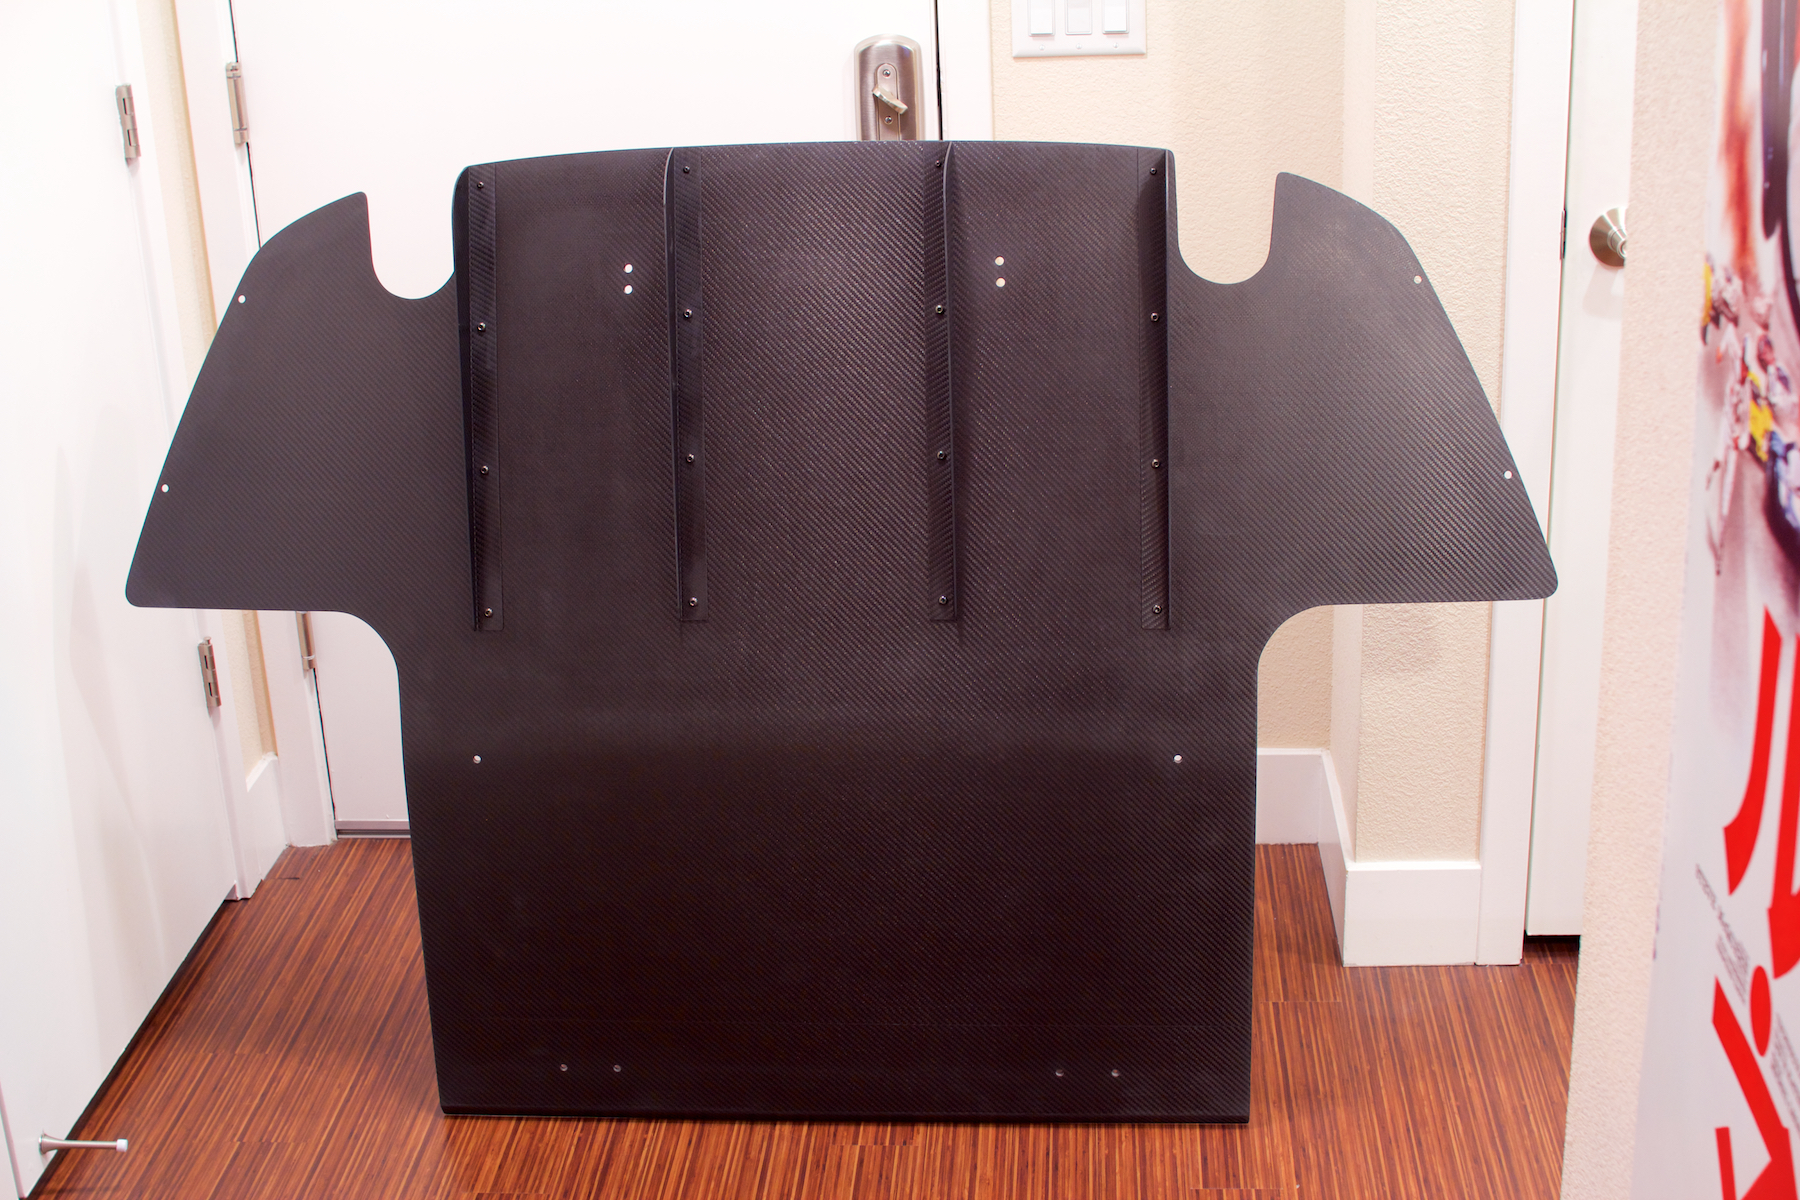
Now you may be asking yourself. Hey you have a single exit exhaust and bumper, why did you get a diffuser meant for a dual exhaust ya dingus? ASM's single exit diffuser only has two fins, and I wanted 4 because it should just be more effective. Also, the single exit diffuser from ASM is trimmed specifically for the ASM siren exhaust. This dual version is trimmed for their dual exhaust. With the exhaust I have I would like to trim it specifically to my needs. It might be a little tricky getting everything to fit, but should be doable. I think I will also reposition the two outer fins since the one on the far right will interfere with with the exhaust opening once it is trimmed. From what I have researched it is a good idea having some fins near the inside edge of the rear tires to help control turbulent air, so I will most likely be doing something like that. I'm not really worried about having an additional hole that I don't need on the left side, it won't really be seen on my single exit ASM rear bumper
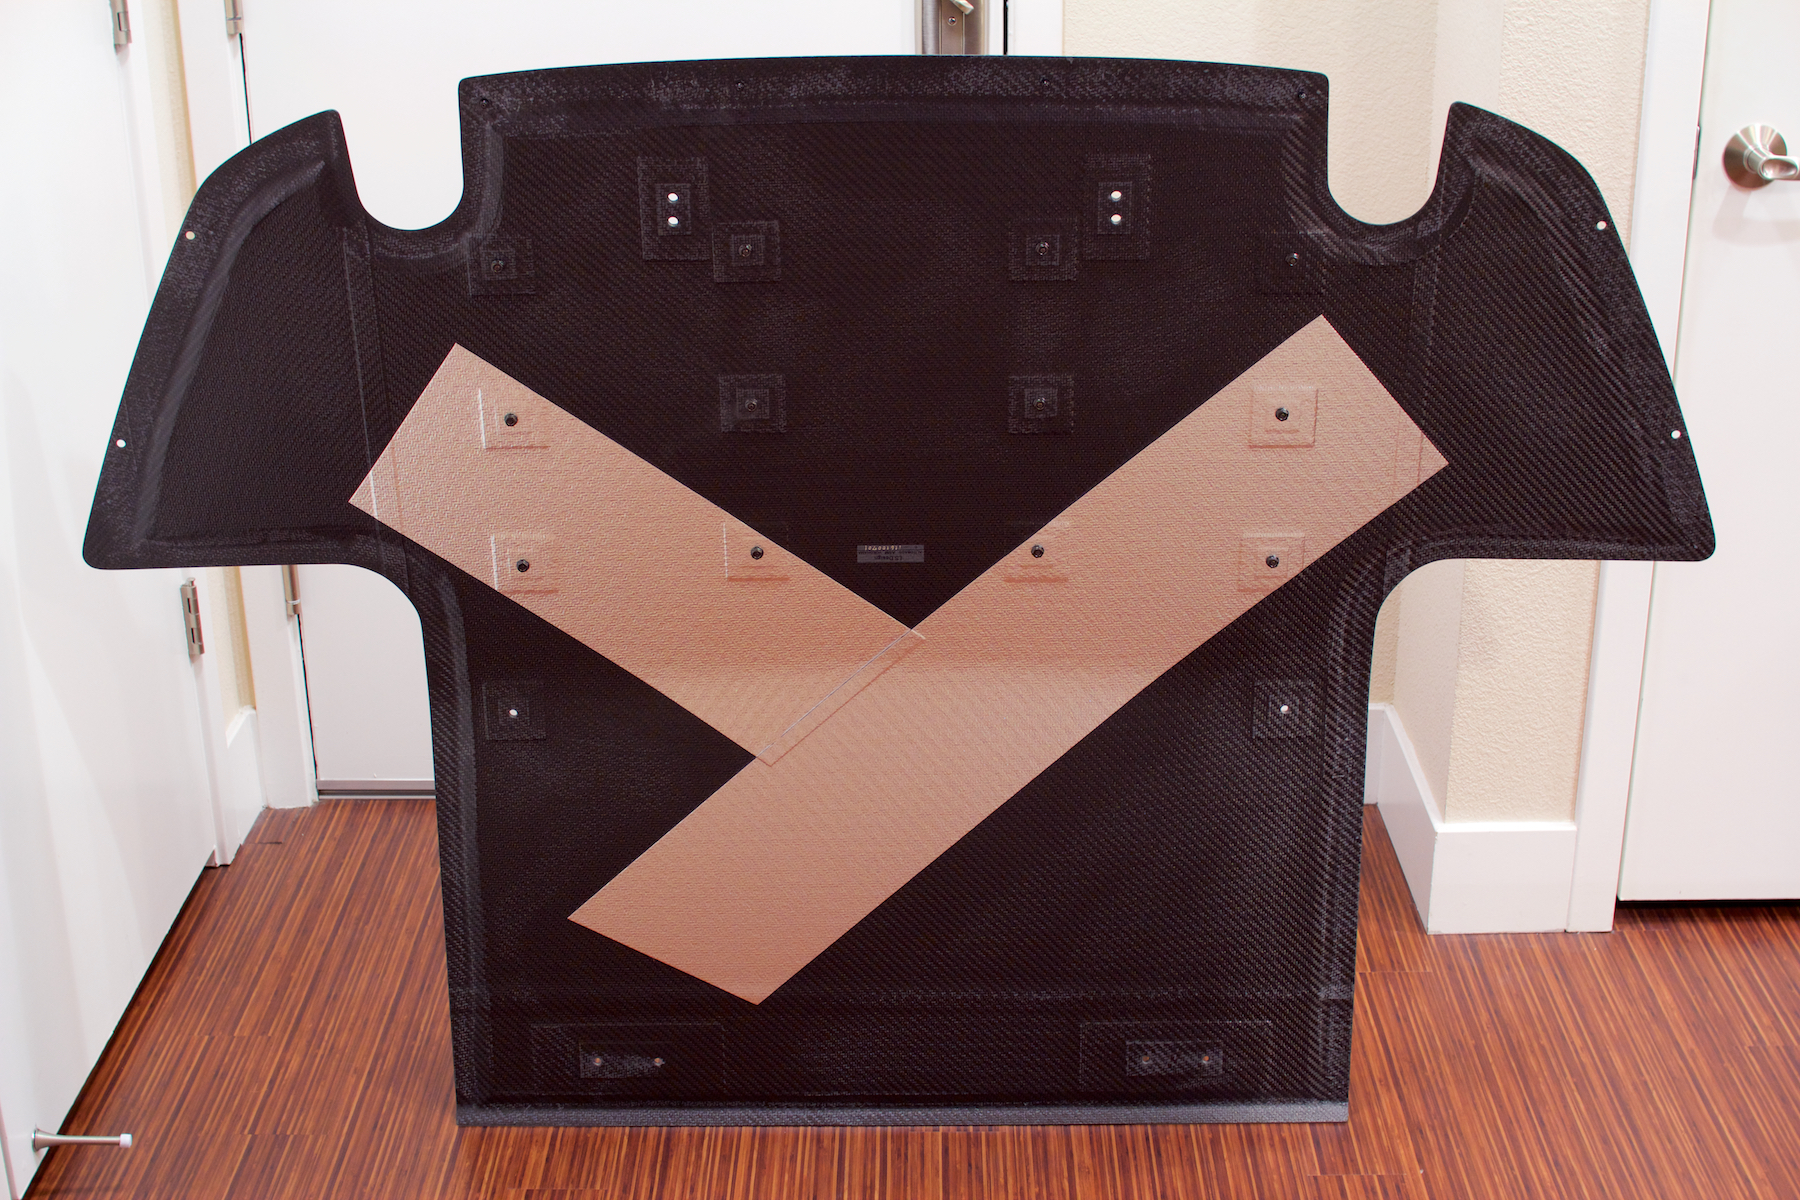
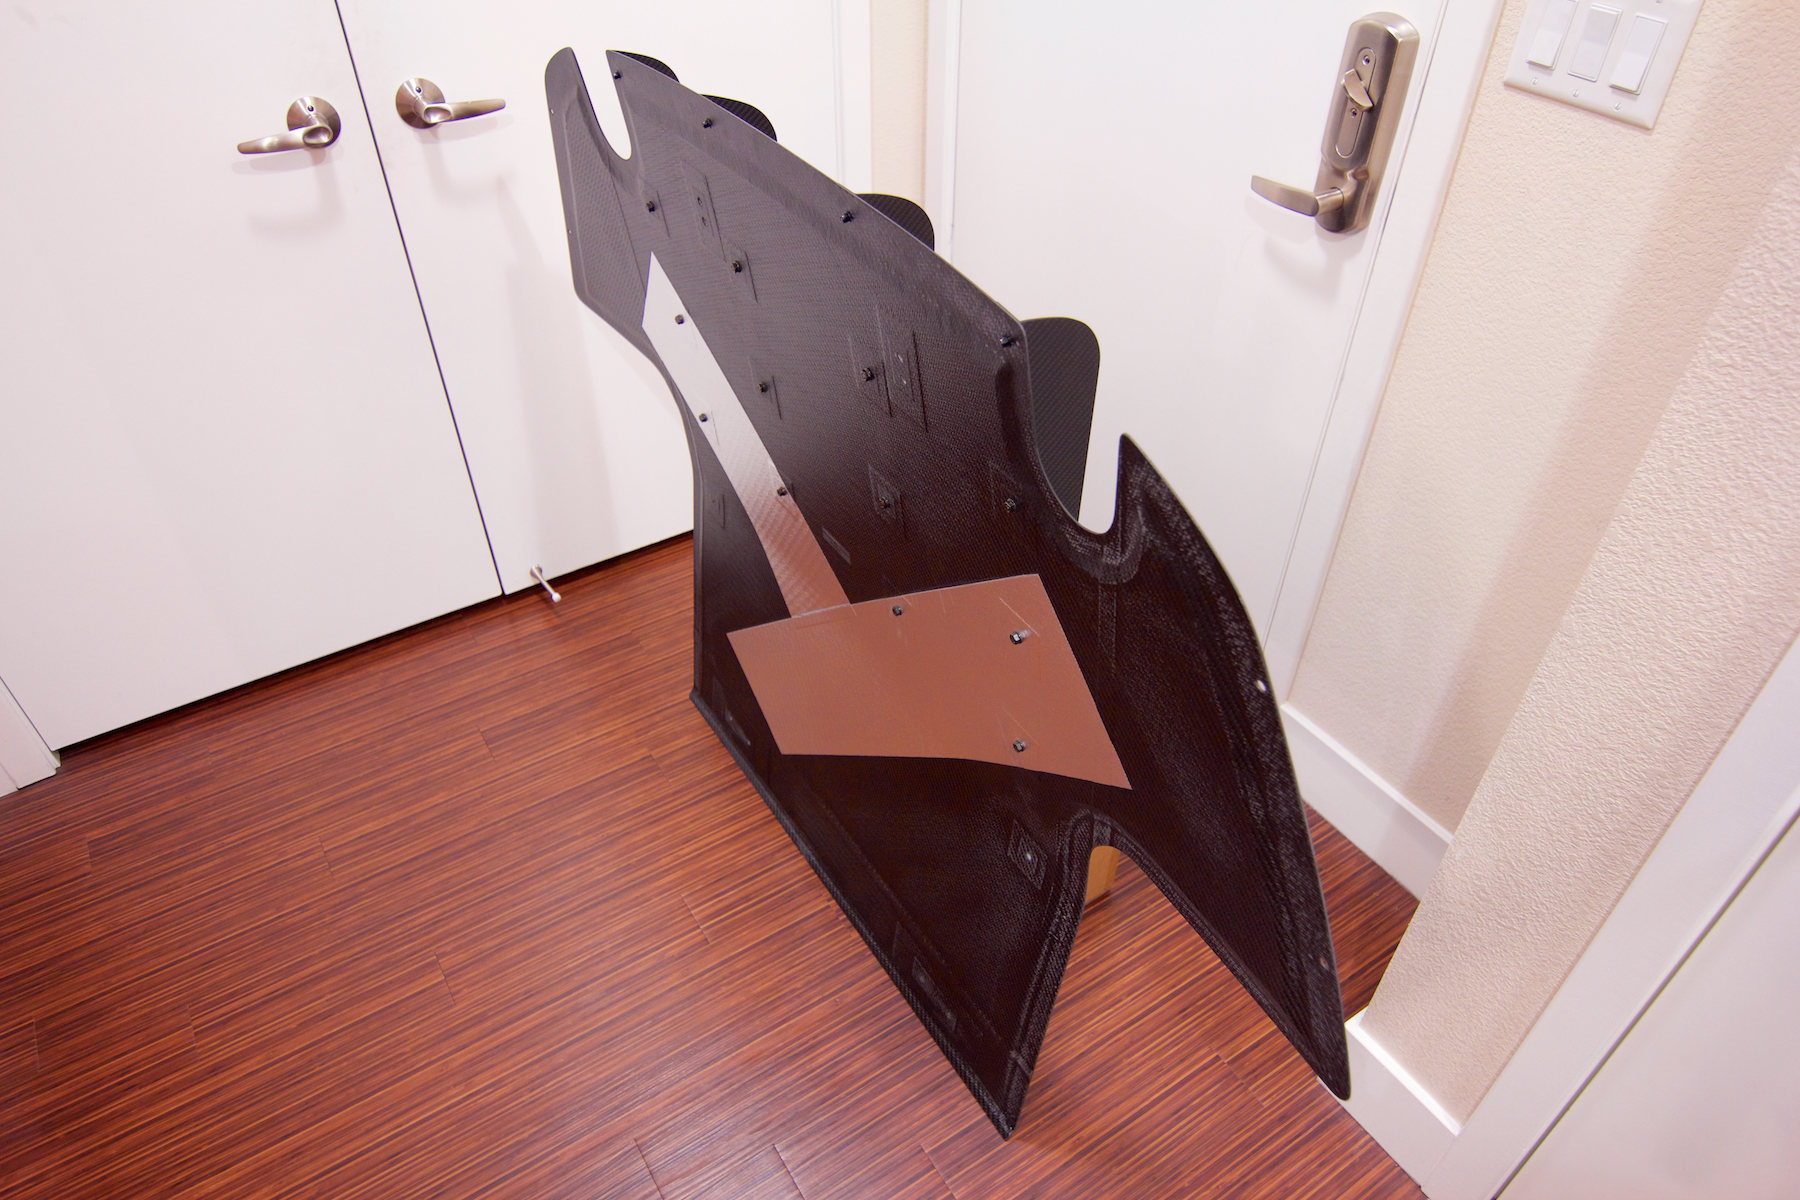

The diffuser is incredibly well made. Multi layer with supports for all the mounting points so washers aren't needed. I hate to trim it but we do what we must for what we love. You can see they include heat resistant tape for the dual ASM exhaust, I will be placing some gold heat resistant tape based on how it lines up with my single exhaust. Everything is so precise it is beautiful. Challenge Technology Center Japan uses CNC water jet cutting to trim all their parts and cut holes. On the same level of the top carbon manufacturers in the business.
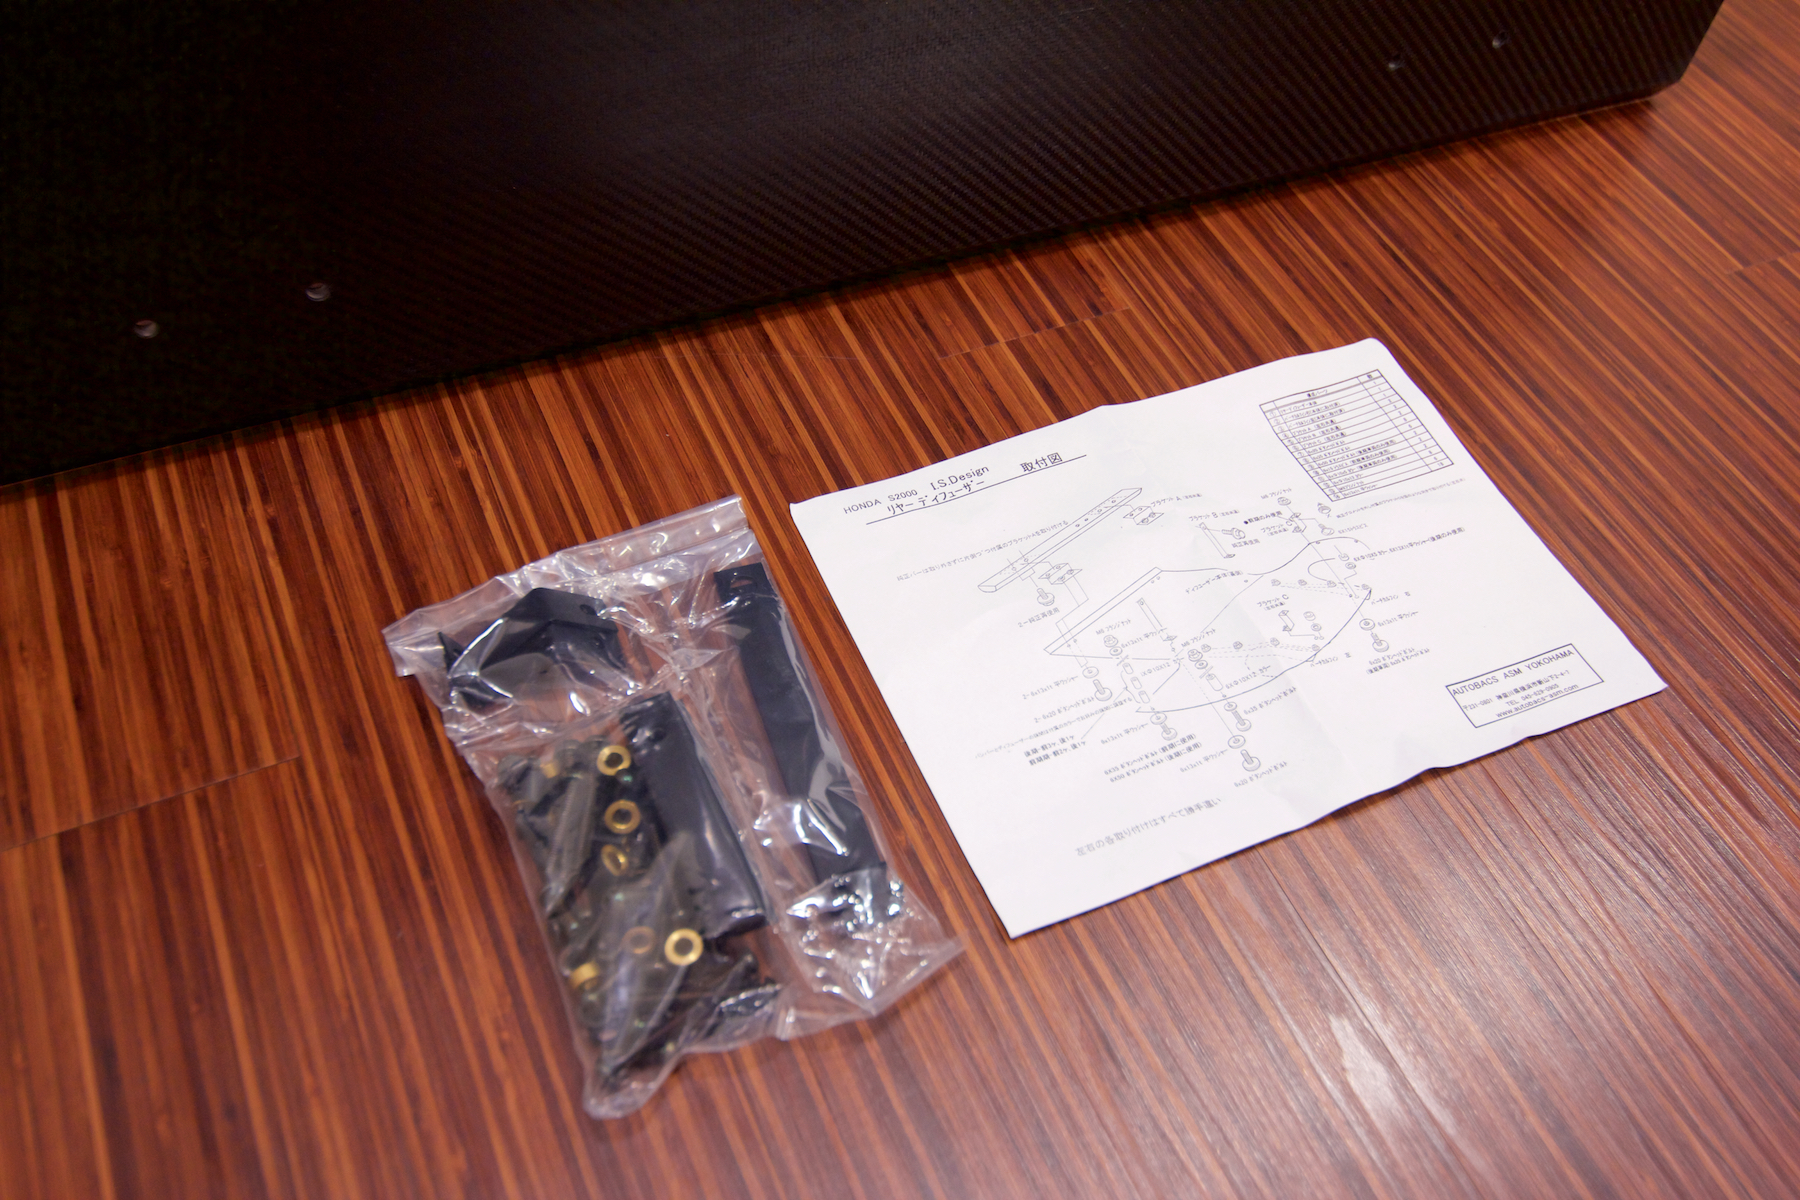
Instructions for install are pretty straightforward, just place all the bolts as listed. And drill 4 holes into the bumper where the supports mount up. Should also be pretty easy to remove while leaving all the mounting provisions in place if needed. I don't think I should have any problems running the diffuser on the street, but if I do it should be relatively easy to remove.
I wish I could put into words how excited I am to have parts like these, but don't really know what to say. I never thought I would ever be able to afford parts like these, let alone an S2000, so I don't take any of this lightly. I also don't hesitate at all to spent this type of money on stuff I love. This isn't a project to make my ideal S2000, it is a project to make my ideal car, period. There isn't really another car under $100,000 that I would want. Some people will understand that, others won't. There are plenty of better value for money options out there, but when it really comes down to it some items are just on a higher level, and I absolutely love that hyper attention to detail, cost be damned.
Also decided to put some Loctite 242 on the endplate mounting hardware, so here are some photos with them removed so you can see the shape of the wing element. I think it works out to be just about neutral in terms of weight on all this stuff. The width of the wing is 1450mm (included the endplates, 1430mm wing surface width), depth is 287mm in the center, 230mm at the ends. The wing stands are around 280mm tall from surface of the trunk.
The trunk weighs 6.4lbs, and the entire wing assembly weighs 6.4lbs. Would be interesting to know how much something like a Voltex Type 7 weighs in comparison. The best part about this wing and mounting setup is that there just isn't any side to side wobble, even mounted as high as it is.
Oh and there is also something else behind that wing..
ASM rear diffuser
Ooohweee that is a lot of carbon fiber!
Now you may be asking yourself. Hey you have a single exit exhaust and bumper, why did you get a diffuser meant for a dual exhaust ya dingus? ASM's single exit diffuser only has two fins, and I wanted 4 because it should just be more effective. Also, the single exit diffuser from ASM is trimmed specifically for the ASM siren exhaust. This dual version is trimmed for their dual exhaust. With the exhaust I have I would like to trim it specifically to my needs. It might be a little tricky getting everything to fit, but should be doable. I think I will also reposition the two outer fins since the one on the far right will interfere with with the exhaust opening once it is trimmed. From what I have researched it is a good idea having some fins near the inside edge of the rear tires to help control turbulent air, so I will most likely be doing something like that. I'm not really worried about having an additional hole that I don't need on the left side, it won't really be seen on my single exit ASM rear bumper
The diffuser is incredibly well made. Multi layer with supports for all the mounting points so washers aren't needed. I hate to trim it but we do what we must for what we love. You can see they include heat resistant tape for the dual ASM exhaust, I will be placing some gold heat resistant tape based on how it lines up with my single exhaust. Everything is so precise it is beautiful. Challenge Technology Center Japan uses CNC water jet cutting to trim all their parts and cut holes. On the same level of the top carbon manufacturers in the business.
Instructions for install are pretty straightforward, just place all the bolts as listed. And drill 4 holes into the bumper where the supports mount up. Should also be pretty easy to remove while leaving all the mounting provisions in place if needed. I don't think I should have any problems running the diffuser on the street, but if I do it should be relatively easy to remove.
I wish I could put into words how excited I am to have parts like these, but don't really know what to say. I never thought I would ever be able to afford parts like these, let alone an S2000, so I don't take any of this lightly. I also don't hesitate at all to spent this type of money on stuff I love. This isn't a project to make my ideal S2000, it is a project to make my ideal car, period. There isn't really another car under $100,000 that I would want. Some people will understand that, others won't. There are plenty of better value for money options out there, but when it really comes down to it some items are just on a higher level, and I absolutely love that hyper attention to detail, cost be damned.
-
andrewhake
- Admin
- Posts: 580
- Joined: Oct 2016
- Location: Mt. __________
- Contact: YouTube IG
#255
Just sitting here staring at it more. The thing that stands out about this diffuser is just how massive it is compared to everything else out there. I am definitely interested in how effective it will be at removing rear lift. So many just sort of fill up that gap left by the rear bumper, this one is 1600mm wide and 1130mm deep, with around 660mm of active angled diffuser area along that depth, and a very smooth transition from flat to angled area.